homemade wild fermented ginger beer {part two}
This website may earn commissions from purchases made through links in this post.
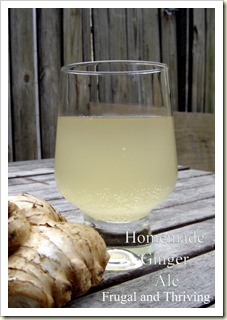
For the past few days, your ginger bug will have been attracting wild yeast from the air and fermenting away nicely, producing carbon dioxide and probiotics.
Now that it’s nice and bubbly, its time to make some ginger beer!
As an aside, along with the probiotics, you will also benefit from the health giving properties of the ginger. Ginger helps soothe nausea, helps with digestion and digestive discomfort, helps lower cholesterol and high blood pressure, can help with congestion, colds and flus, reduces inflammation and strengthens immunity.
For less than a dollar a bottle, this is some tasty medicine!
What you will need:
- A large jar or container that holds at least 2 litres (a couple of smaller ones work just as well)
- A clean cloth or muslin and rubber band to cover the jar
- 2 litres of de-chlorinated water (see yesterday’s post on how to de-chlorinate water)
- 1/3 cup of finely chopped ginger or approximately 12cm (more or less according to taste – experimenting is the fun part!)
- 1 – 1 1/2 cups of sugar (raw, white or rapadura) depending on taste. Start with 1 cup and increase or decrease in future batches to suit your own preferences.
- juice of 1 lemon
- 1 cup of ginger bug
- 2-litre glass or recycled plastic bottle (I used 2 x 1 litre recycled plastic bottles that hubby brought home from a work function)
making ginger beer
In a large saucepan bring the water, ginger and sugar to the boil (lid on) and simmer for 5 – 10 minutes. Leave to cool.
When cold, add the lemon juice and 1 cup of ginger bug and pour into your jar(s).
Give your ginger beer a good stir, cover with cloth and leave to sit on the kitchen bench away from sunlight.
Leave your ginger beer sitting on the bench for 2 – 7 days until it’s bubbling away. Make sure you give it a stir twice a day to encourage the air (and the airborne micro-organisms) into your beer. The longer you leave it, the less sugar there will be (the micro-organisms will eat it all up), and therefore the less sweet it will be.
Bottling your ginger beer
Once your ginger beer is bubbling, strain it into sterilised bottles. You can use glass swing-top bottles or recycled soft-drink bottles. Leave a bit of head room in your bottle for expansion, especially if it’s glass.
Tightly secure the lid on your bottle and let your bottle sit on the kitchen bench for a further 24 hours. The mirco-organisms will still be consuming sugar and giving off carbon-dioxide and the sealed bottle will allow it to build up, giving your ginger beer its fizz. After 24 hours, refrigerate you beer to chill and to stop the carbon dioxide from further building up.
This isn’t an exact science, if your kitchen is cold, you might want to leave it a little longer, just be aware that too much carbon build up can lead to exploding bottles (less of a problem if the bottles are plastic, although you may get beer fountains when you open the bottle, so open over the sink).
This ginger beer is fermented, so be aware that it is very mildly alcoholic and as we’re dealing with many variables (air, temperature etc.) each batch will be different. Fruit juice sodas in particular ferment quickly and can, apparently, get pretty alcoholic. If you plan on making lots of fermented soft-drinks, particularly juice ones, you may want to invest in a barometer, which will tell you the alcoholic content. If it tastes alcoholic, it probably is – my batch tasted like soft drink.
Your ginger beer is now ready to drink.
Bottoms up!


Oooh, Melissa, this looks like fun! I have been experimenting with sourdough recently, so can confidently say that there is lots of microfauna floating around our house! Will try this as soon as it warms up a bit. Tassie is still freezing!
I’ve been using this kind of fermentation for veggies for a while now, but have never tried making ginger beer. I’ll definitely be giving it a go :)
PS. I’ve heard you can make alcoholic cider with just long life apple juice and some extra added apples (to add the microorganisms and yeast). I’m planning on trying that soon as well :)
Liz, a reader sent me an email with links to these sites on making cider (and other alcoholic beverages) from juice. Looks interesting.
http://www.oztops.com.au/
http://e-z-caps.com/
I added roughly 1/8 cup of bug plus some of the bug’s ginger and turmeric, to a 1.5 litter bottle of water, then added 1/3 or 1/2 of a prune. Left out for 3 days, so far. Happy, carbonated drink!
Hi Mary, thanks for sharing your recipe. The addition of turmeric and prune sounds delicious and healthy! I’m going to try it. Thanks again.
Hi, just making your Ginger beer recipe. Question is, when I take a cup of Bug, do I strain off the two cups that have been developing? Then I keep one strained cup of Bug for adding to the beer, and can I pour back the rest, return the strained off ginger root to that cup and add necessary ginger and sugar to keep Bug going? Are all these step OK in the process as a whole?
If I understand your question correctly, then yes, add the excess liquid back to the bug and feed away. Let me know how it goes.