
Organising Recipes and Meal Planning Using Evernote – a Definitive Guide
This website may earn commissions from purchases made through links in this post. As an Amazon Associate, I earn from qualifying purchases.
Save all your recipes (digital and hardcopy) in one place so you can easily organise and find them, create meal plans and write grocery lists. Here’s how to use Evernote for recipes.
Are you a recipe hoarder? Do you cook recipes from your collection or do your recipes gather dust, untested and untasted?
Evernote (the free note-taking software) can help you collate all your recipes into one database so that they can be easily searched, browsed, planned for, shared and, of course, cooked. Think of it as your own personal recipe library of all your favourite foods.
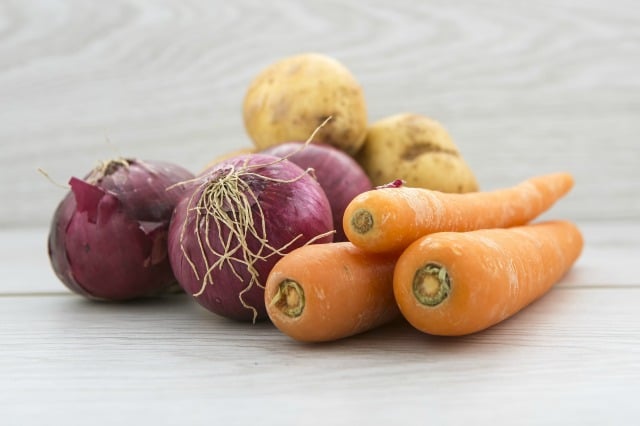
Collate recipes from magazines, books, and blogs along with written recipes, typed recipes, downloaded recipes, scanned recipes and even photographed recipes into one super-database.
Then tag and search for recipes by ingredient. Browse your recipes for new dessert ideas. Create a menu plan and grocery list. Sync with your mobile to view your grocery list in the supermarket or easily look up tonight’s meal.
Getting organised takes a little time but it will save you time in the long run.
I have been using Evernote for recipes and other info since 2012. That’s a lot of recipes I’ve collected over the years. Because you can clip whole web pages, I have favourite recipes from websites that no longer exist!
I’ve played around with other note-taking apps and keep coming back to Evernote because it is so easy to use and so easy to capture and store information in a variety of formats. I have no affiliation with them, just enjoy using their product after all these years.
Below is how to use Evernote to not only collate and organise your recipes but to create menu plans and grocery lists from your personal recipe library.
Getting Started With Evernote to Digitize and Store Recipes
What is Evernote?
Evernote is a digital notebook/scrapbook that allows you to take notes and collect, store, and organise content from just about anywhere. It is a cross-platform app, which means you can sync your notes and files across devices, so you have access to them everywhere. There is a free and a paid plan.
The FREE Evernote plan is sufficient for organising recipes and meal planning. The free plan allows you to:
- create 1 notebook
- create up to 50 notes
- upload 2500MB per month
- clip webpages
- attach images and documents
- tag and search
There are more features, but these are the ones we need to organise recipes.
Unfortunately, since 2023, Evernote downgraded their free plan, so you can now only use it on one device.
You might also like:
Setting up Evernote – Apps, Software, Web Clipper for Browsers
First, choose the device on which you want to install Evernote. The app is available for iOS and Android, you can also access Evernote through a web browser or download the software (Evernote for PC or Mac).
I have Evernote on my phone because I can quickly capture recipes, either online or hardcopy with the camera, and put them directly into Evernote. If you prefer, you can use it on your desktop or tablet – whatever works best when you’re planning and cooking.
If you browse online on a computer or laptop, you will also want to install the Web Clipper plugin for your browser. This allows you to clip pages into Evernote from the computer.
Creating a Notebook Structure for Your Recipes
Because Evernote has a search function, you don’t have to create an intricate notebook structure. Personally, my brain likes structure, but a simple notebook called ‘Recipes’ is sufficient.
Note: with the free version, you can only have one notebook now, but this information is still relevant if you decide to upgrade.
The screenshots below are mostly from the desktop app, but it works the same whether you are accessing Evernote from the mobile app or web browser.
To make a recipe folder, click on the plus sign next to Notebooks as shown below.
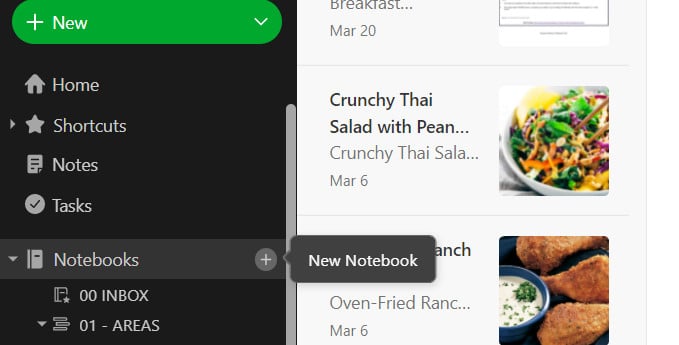
Then name your notebook and hit create.

If you are JUST using Evernote as a recipe organiser, you might like to make your Recipe Notebook the default notebook so that all the items you clip go straight to that notebook (you can choose where notes go when you save, more on that below).
To make your Recipe Notebook the default, right-click on your newly created notebook and choose the option ‘Set as default notebook’.
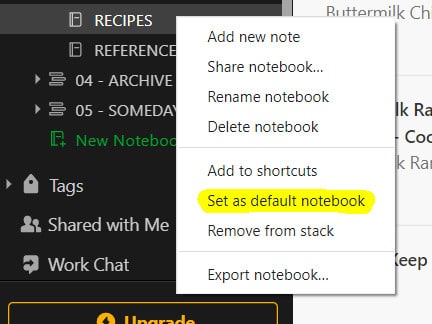
As a side note, if you’re curious, I use Evernote for other things so my default notebook is my ‘Inbox’ with a double zero in front so it appears at the top of the list, and I use the PARA method of organising my folders and information. My recipe folder is in the ‘Reference’ stack. I empty my inbox semi-regularly and sort notes into their folders.
That’s it for setting up Evernote for recipes. It’s time to get clipping, collecting, collating and cooking!
Hint: there’s a tonne of things you can use Evernote for, but remember it’s cloud computing so keep security in mind when creating notes that include personal information.
How to Add Recipes To Evernote – 5 Ways to Capture Recipes
There are several ways that you can build your recipe database in Evernote from writing recipes out to scanning recipes or clipping recipes from the web. Here’s how to do each one.
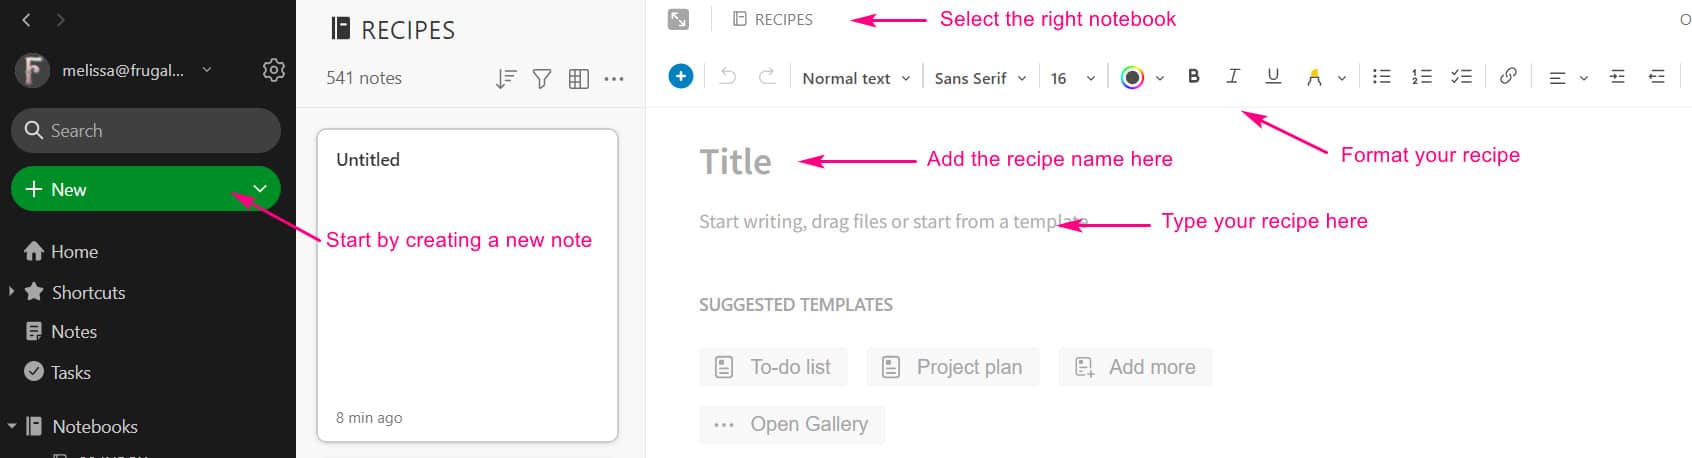
Writing Recipes Directly into Evernote
This one is pretty straightforward. Simply click on a new note, give it a title (recipe name) and type your recipe out. Add tags as necessary (see below).
This is useful for recipes that you create yourself. Or maybe grandma has divulged her secret sponge cake recipe and you’ve scribbled it down on the back of an envelope. Type it up so it’s not lost forever.
If you have a paid plan, you can format a note and save it as an Evernote recipe template, but the free version doesn’t include this feature.
Clipping Recipes from the Internet Using the Web Clipper
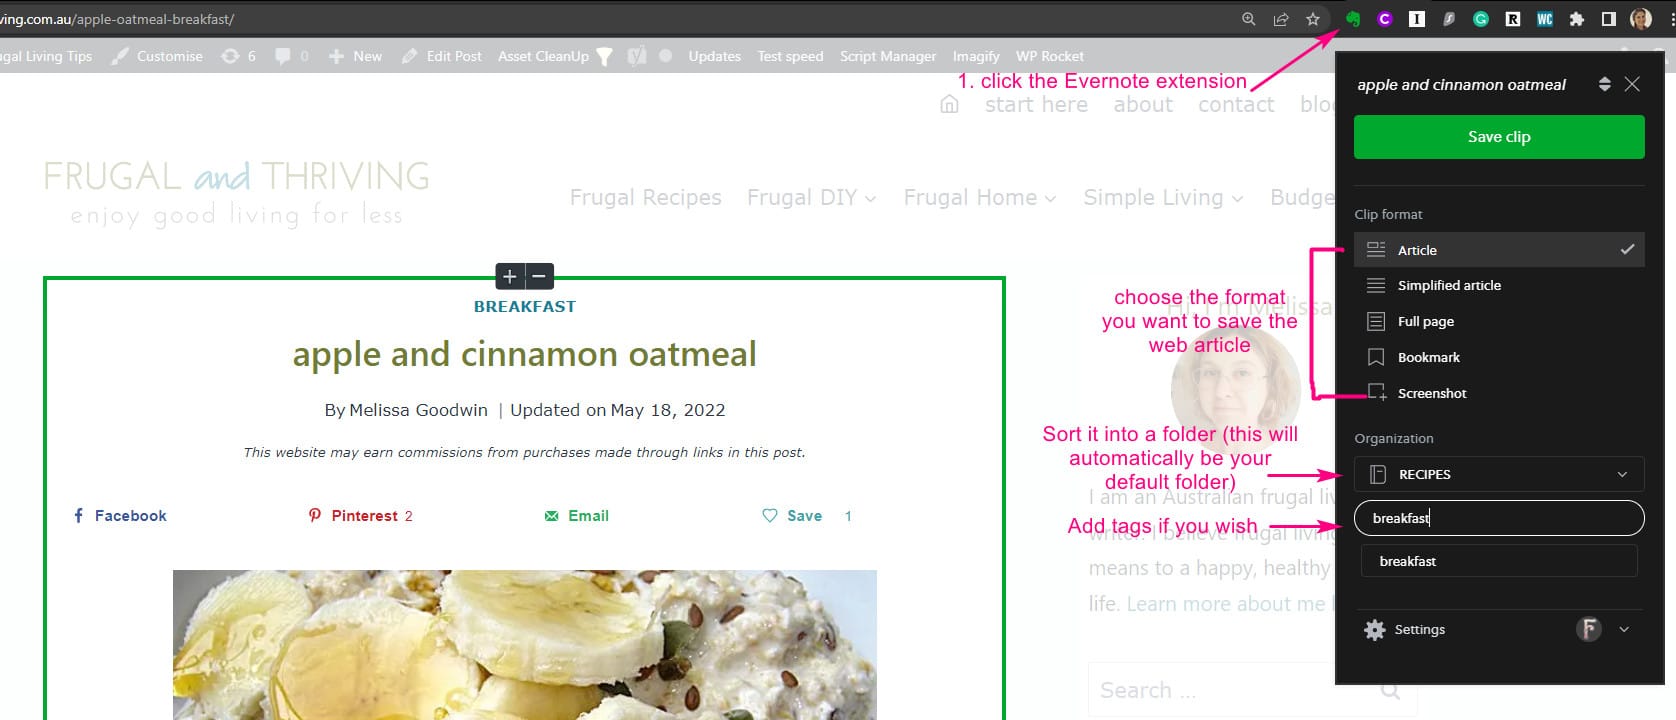
If you’re browsing the internet on a laptop/ desktop computer and come across a great recipe, this is how to easily save recipes into Evernote.
If you haven’t installed it, add the Web Clipper Extension to your browser and sign in to your Evernote account.
Then simply click on the Evernote Web Clipper extension (the Green elephant to the right of the address bar). This will bring a drop-down menu to clip. Select how you would like to save the article (full article saves pictures with the recipe), check it’s going to the right notebook, add tags if you want to use them and click ‘save clip’.
How to Save Recipes on Your Phone
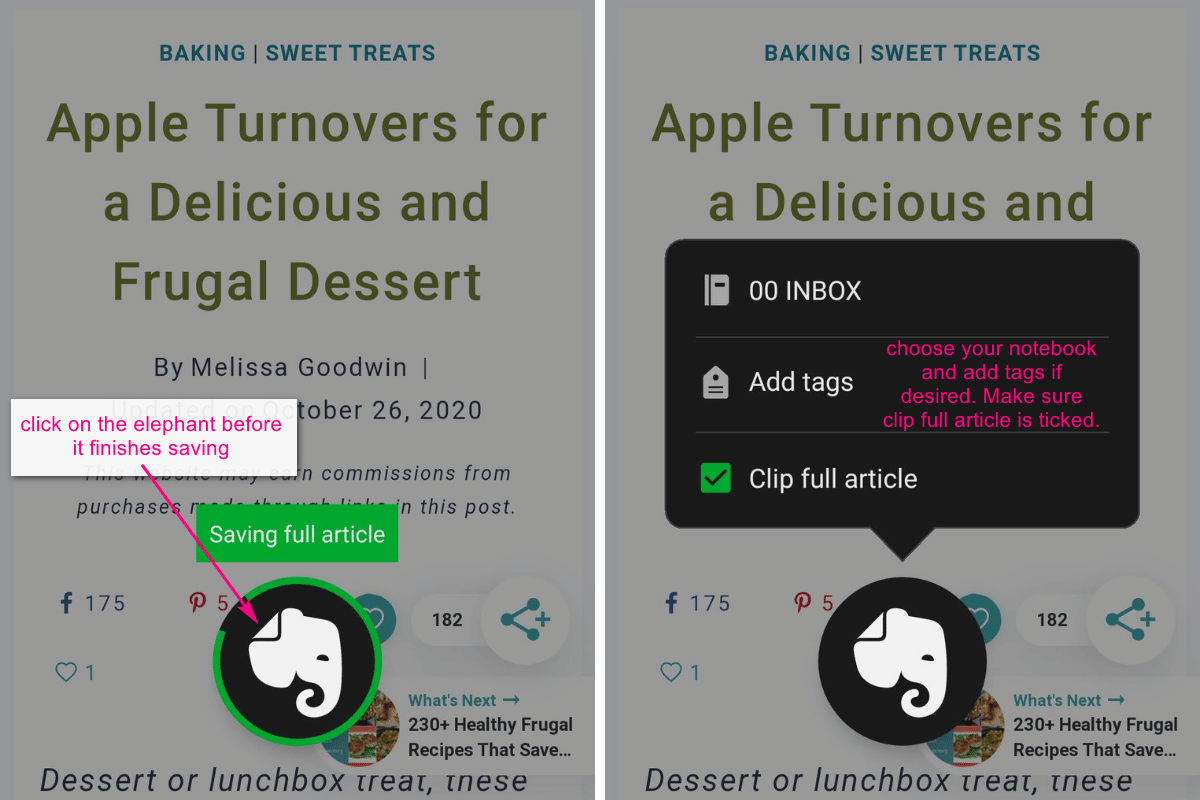
You don’t need to be on a browser to clip a whole recipe into Evernote. You can use the share function on the mobile device Evernote is installed on.
First, use select ‘share’ on your mobile device and then choose the Evernote sharing app in the menu.
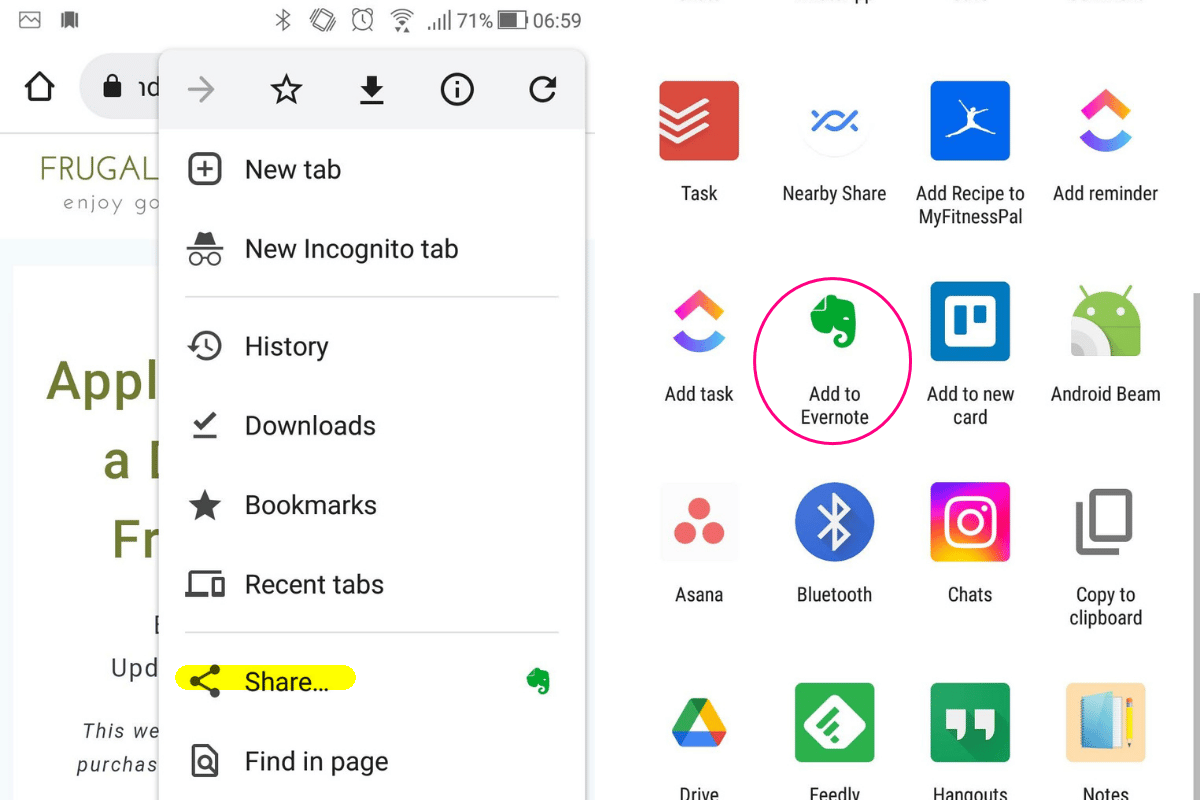
You can specify which folder the note goes to (if you want it to go somewhere other than the default folder (paid only)), and add tags by tapping on the elephant icon before it completely saves.
Scanning Recipes into Evernote
Do you have a bunch of paper recipes? Have you seen a great recipe in a magazine at the doctor’s surgery?
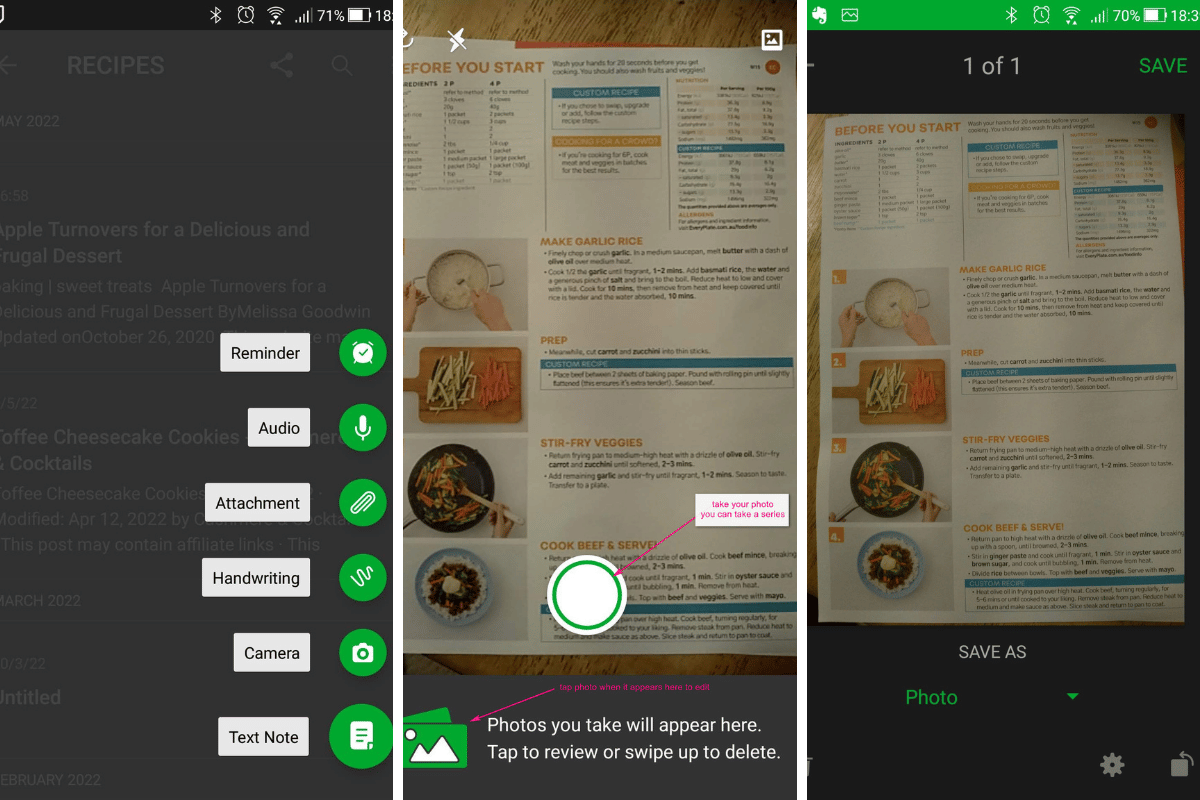
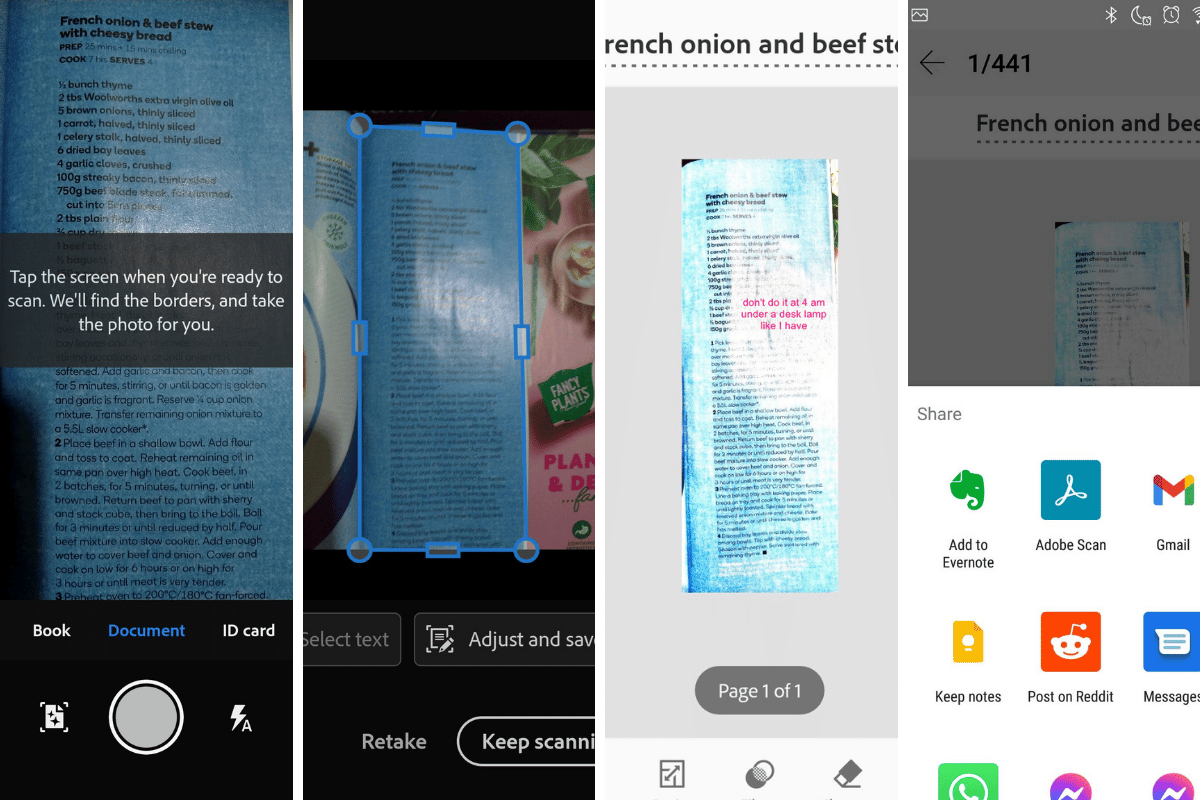
You can use the camera on your phone or tablet as a scanner to scan the recipe into Evernote or use a flatbed scanner connected to your computer if you prefer.
Open the Evernote app on your device, press the large plus icon at the bottom of the screen and select camera. Take a photo of your recipe, click the image to edit it, choose how you would like to save it and then press save.
Then give your note a title, tag it if you like (see below for more on tags), make sure it’s in the recipes folder and save the note.
If you want more control over how your scanned images appear, you can use a free dedicated scanning app on your phone like Adobe Scan or CamScanner, edit the image in the app and then share it to Evernote.
Finally, when it comes to scanning recipes into a database from books, here’s an awesome tip from No Ordinary Homestead: scan the index pages of each book in your personal cookbook collection into Evernote so that you can search or browse these simultaneously with your digital collection. The searches your run on the indexes won’t be as powerful as those run on individual recipes, but it allows you to have much easier access to your hardcopy recipes.
Importing Recipes From Your Desktop
If you have a bunch of recipes on your computer, you can import them in bulk using the import folder function and turn them into an Evernote recipe! A pdf or image file will open as a note, but a Word document will be imported as an attachment.
The first step is to create a new folder on your computer. Call it Evernote Imports or something similar.
Copy and paste all of your recipes into the Evernote Imports folder.
The next step is to create a connection between Evernote and the new folder by going to Tools>Preferences>Import Folders.
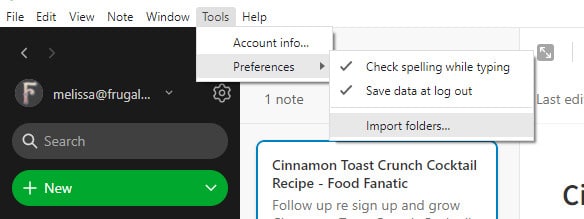
Navigate to the folder on your computer and then choose which Evernote notebook you want your notes to be imported into and select save.

All the files in your Evernote Imports folder on your computer will be automatically imported into Evernote.
Whenever you add anything new to the Evernote Imports folder on your computer, it will be automatically imported into Evernote the next time it is opened.
Save Money on the Groceries eBook

For more ways to meal plan and save money on groceries, check out the eBook Plan Cook Save: How to Eat Well When Money is Tight and Time is Short.
*Learn how to set the right grocery budget for your circumstances.
*Find out the easiest and quickest way to reduce the grocery bill.
*Discover a meal planning strategy that will only take you a couple of minutes a week but will save you hours.
Organising Your Evernote Recipes
So how are you going to find that yummy chicken recipe if all recipes are dumped into one notebook? That’s where tags and Evernote’s search function come in.
Let’s get straight to the search function because you may decide you don’t need tags with Evernote’s search capabilities.
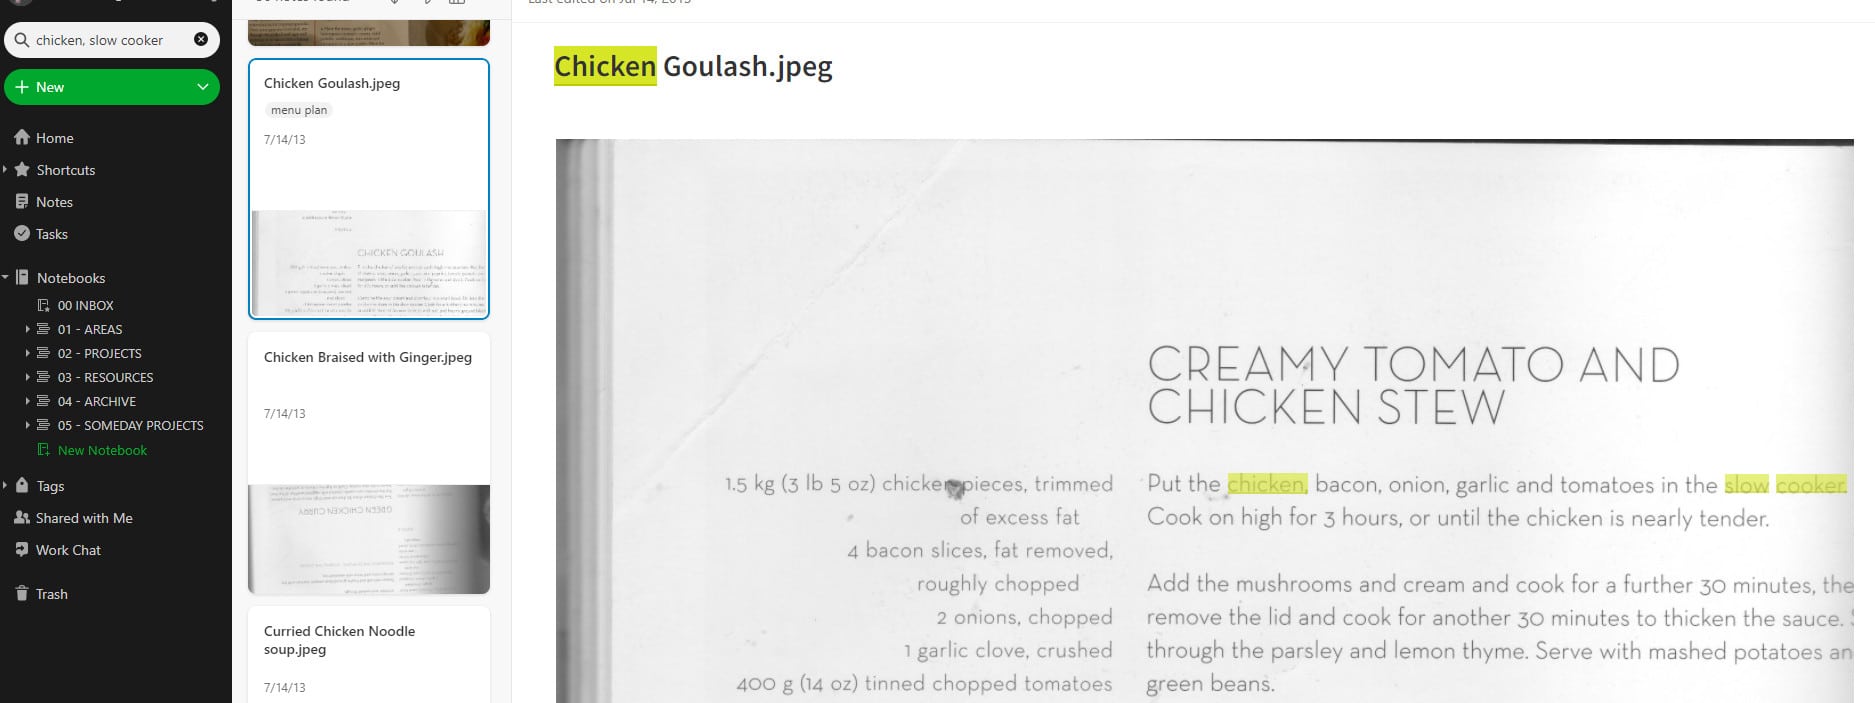
Not only can Evernote search text within the body of a note, a note’s title or a note’s metadata, but it can also search text in images and PDFs. That means if you take a photo of a recipe that has the word ‘chicken’ in it, and Evernote can pull that recipe up with a simple search (you may need to sync manually with the server before an image is searchable).
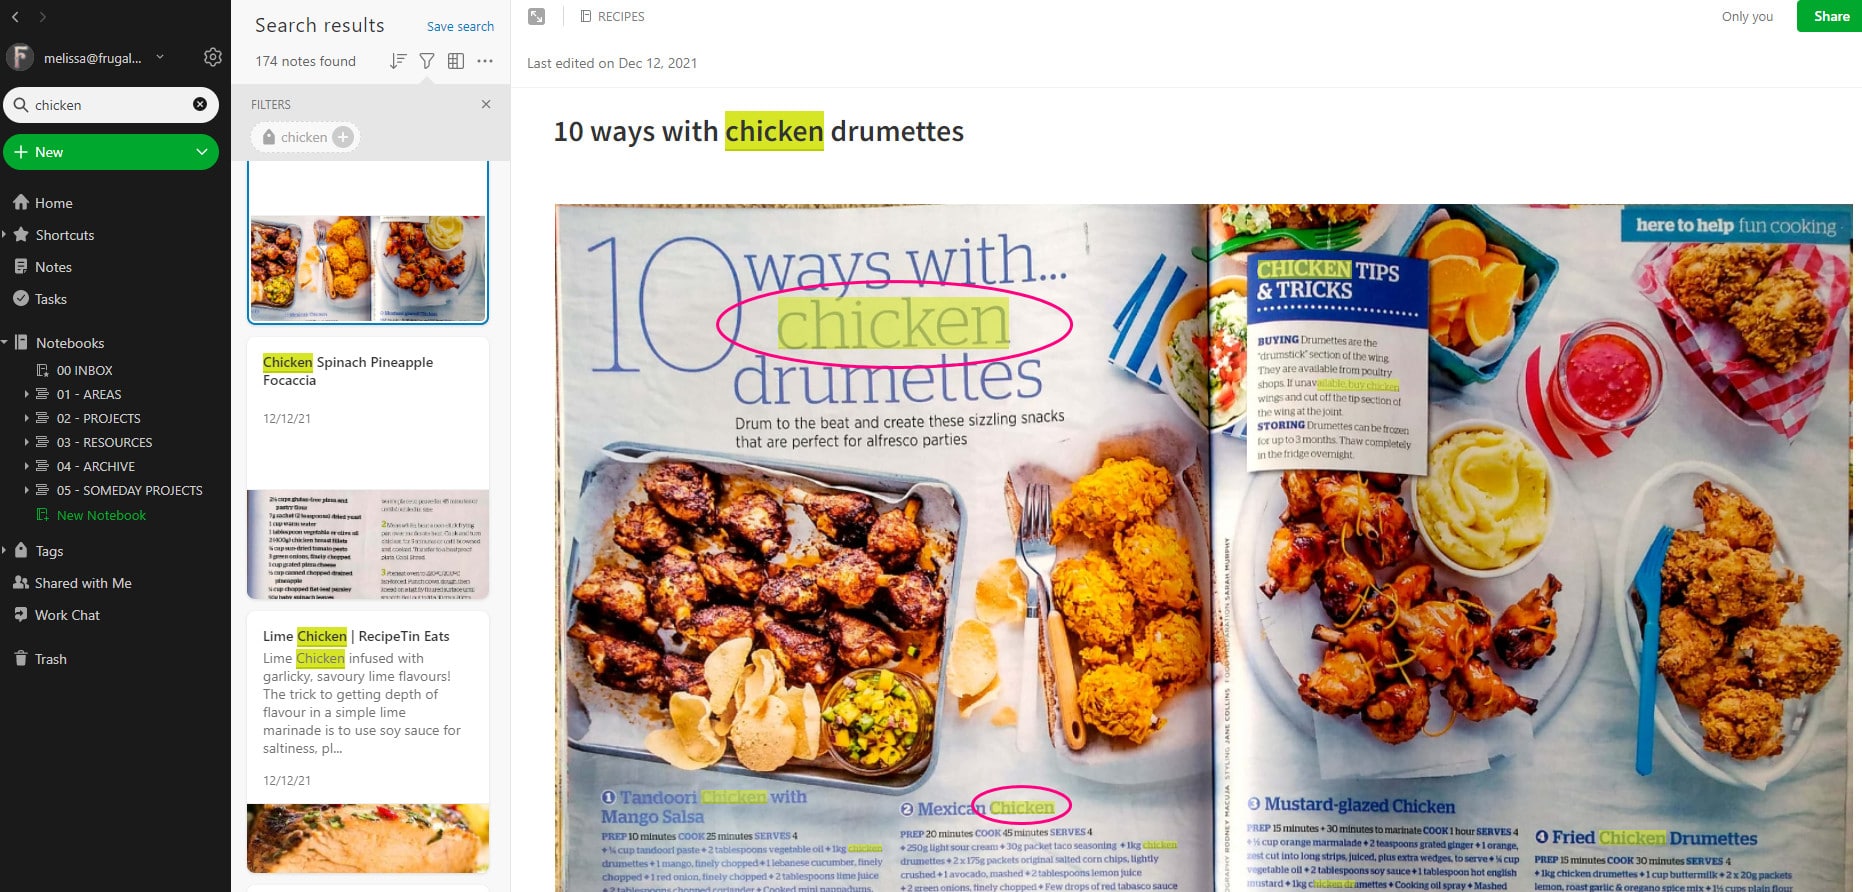
You can do some pretty nifty stuff with Evernote’s search function, like searching for recipes that include chicken and are made in the slow cooker. For more information check out the knowledge base on advanced search operators.
Using Tags (Labels) in Evernote
If Evernote’s search function is so good, why bother adding tags?
If you want to browse recipes as a group using words that don’t appear in the recipe, instead of creating a bunch of folders, you can use tags instead.
For example, instead of creating a ‘dessert folder’ you can add the tag ‘dessert’ to dessert recipes. That way you can search for the tag ‘desserts’ and all the recipes with that tag will appear, regardless of whether the word is in the text.
‘Favourites’ is another useful tag to easily find your family’s favourite meals. Other handy tags might be ‘easy’, ‘make-ahead’, ‘freezer meal’, ‘loved it’, ‘kids meal’.
So don’t discount tags altogether. While there’s no need to tag every recipe because of Evernote’s search function (saving you time), it can still be useful to tag some recipes.
Hint: You can use more than one tag per note.
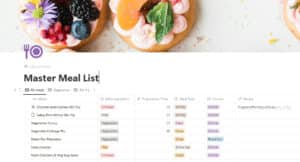
You might also like: Make Meal Planning Easier with a ‘Favourites’ Master Meal List.
Don’t Forget to Add Notes!
Evernote is a notetaking app first and foremost, so don’t forget to add notes to the recipes you cook. If you’ve modified the recipe, substituted ingredients, have a favourite side that compliments the dish, or otherwise made the recipe your own, add your notes above or below the recipe.
Now that we’ve captured, organised, and tagged our recipes, it’s time to meal plan, shop, and cook all these recipes.
Creating a Meal Plan in Evernote
Once you have your Evernote recipe organiser sorted, you can create a simple meal plan that links to those recipes so they are easy to find when it comes time to cook. There are three ways to create a simple meal plan in Evernote.
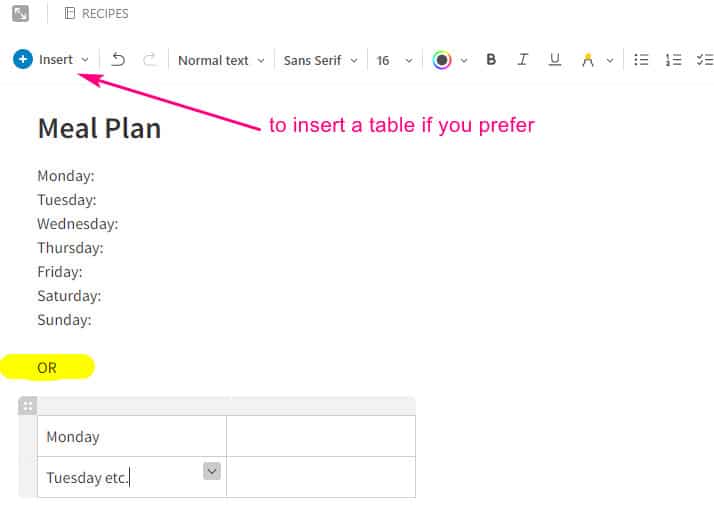
You can make a basic note and type in the days of the week as a list (easiest if you’re creating your meal plan on a mobile device) OR you can put them in a table using the Insert button:
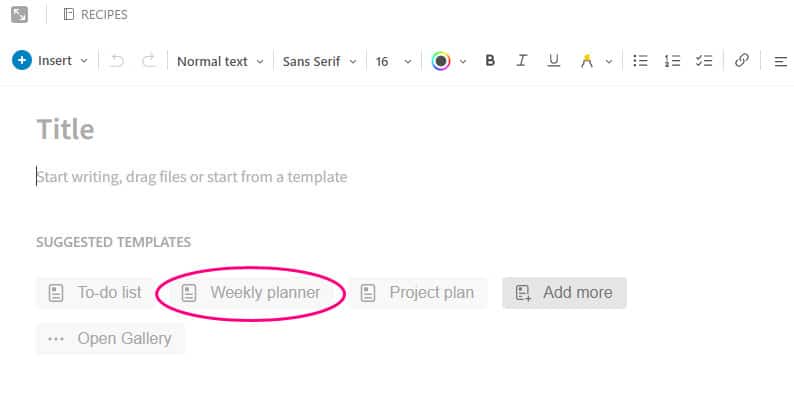
The third way is to use an existing template. There actually is an Evernote meal plan template with a shopping list template, so use that one if you prefer. You can find it in the gallery by clicking the ‘Open Gallery’ button on the note. I like the Weekly Planner format better, so I’ll show you that one.
First, before you type anything into the note, select the template. You will need to click on the ‘add more’ button to pull up the Weekly Planner template or the ‘open gallery’ button if you want to use the meal planning template.
Then click to apply. This is the basic template:
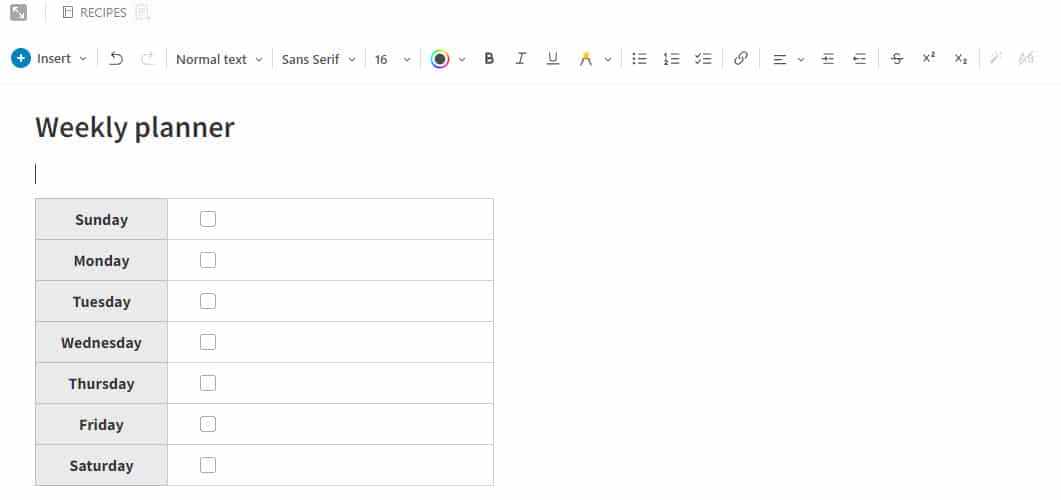
Feel free to pretty your meal plan up if you like, change the days to suit your schedule (our meal plan starts on a Friday because of when we shop) and add a ‘meal plan’ tag at the bottom.
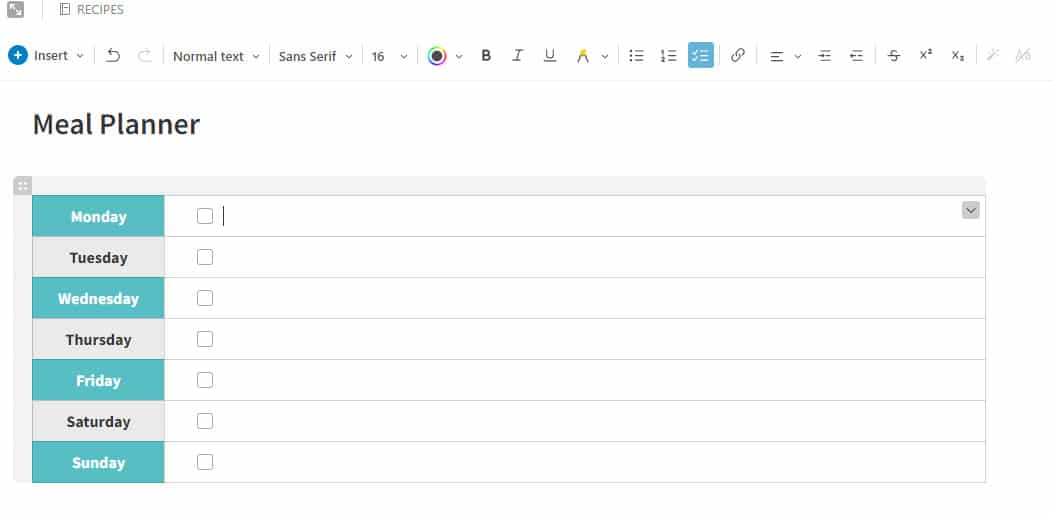
That’s your basic meal plan created. You can reuse this same note over and over every week OR you can create a new note each week, save them all in a ‘Meal Planning’ folder and then reuse old meal plans, which makes life easier.
Adding Notes to Shortcuts Menu, Mobile Homescreen and Sharing
If you reuse old meal plans, you might like to tag them with the month, so you can reuse seasonal meal plans at the right time of the year.
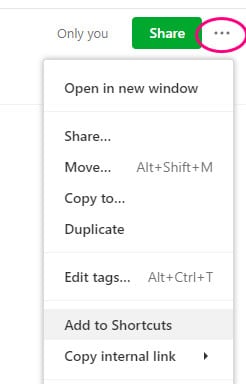
If, instead, you reuse the same meal planning note over and over, create a shortcut by clicking on the three dots on the top righthand corner of the note so it’s easy to find. Once you’ve added the note to shortcuts, it will appear in the shortcuts menu on the left-hand side.
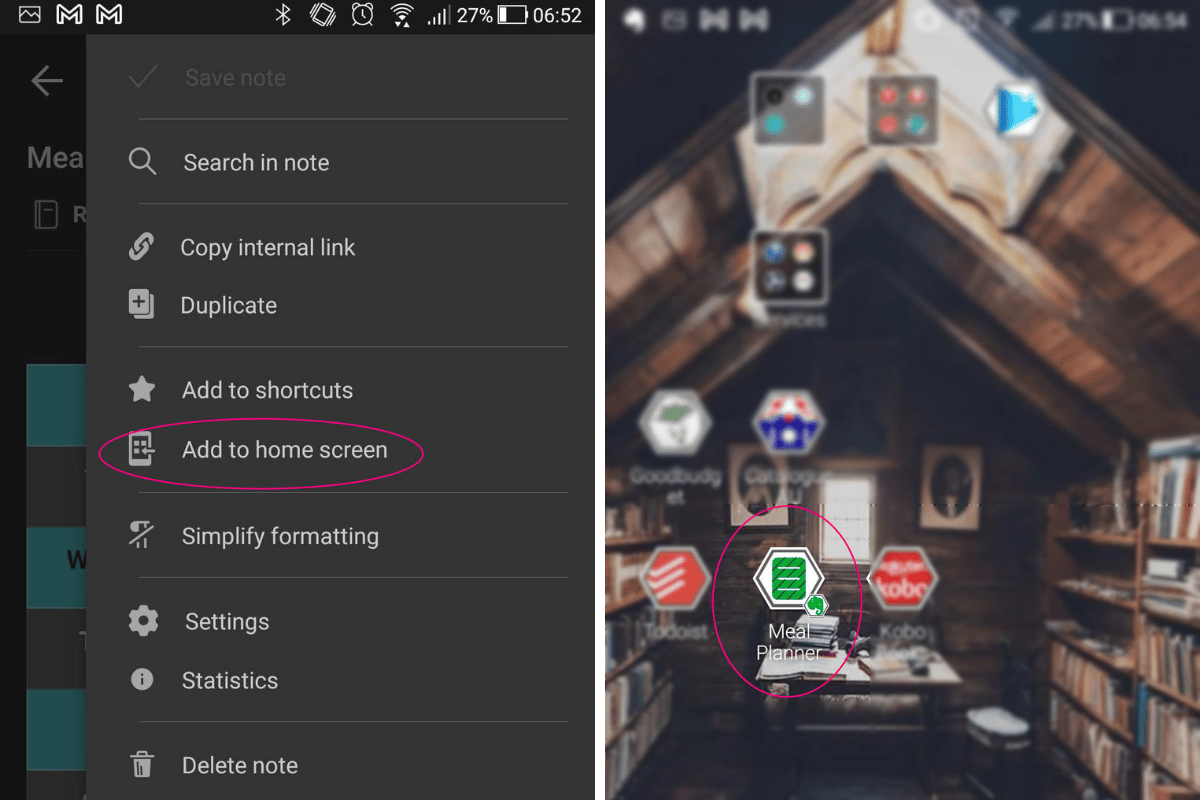
You can also create a shortcut on your phone or tablet’s home screen for quick access. On your mobile device, tap the three dots on the top right corner and select ‘Add to home screen’ to make a mobile shortcut.
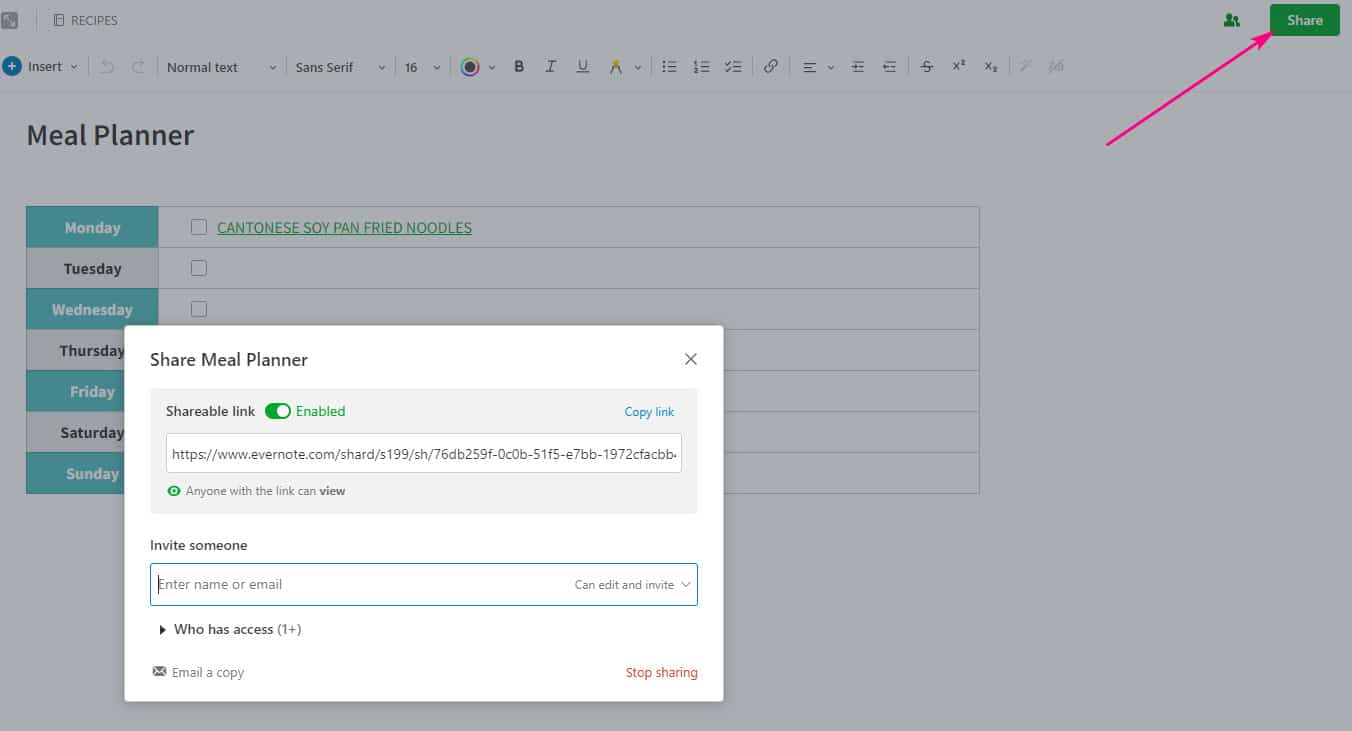
If you want to share your meal plan or shopping list with a partner or family member, you can use the share button on the top right-hand corner of the screen. The link is publically accessible, so the other person doesn’t have to have Evernote installed, but only share it with whoever you want to see that note.
Filling In Your Meal Plan With Evernote Links
Now that you have your recipes stored in Evernote and a basic meal plan template, have a look through your recipes and see which ones you would like to cook.
Some people find it useful to have a regular cycle to their menu plan. For instance, Mondays are chicken nights, Tuesdays are vegetarian nights, Wednesdays are burrito nights etc. This makes it easy to search Evernote for “chicken” recipes to slot into Monday night.
You might also like: Meal Planning Hack Using a Meal Rotation
Alternatively, you can start with the ingredients you have on hand or with produce that is currently in season and then search your recipes using those ingredients.
Tip: If while browsing the web or cookbook you find a recipe that you would like to cook in the next menu plan cycle, tag it with something like “to cook” or “next week” to make that recipe easy to find again when you need it.
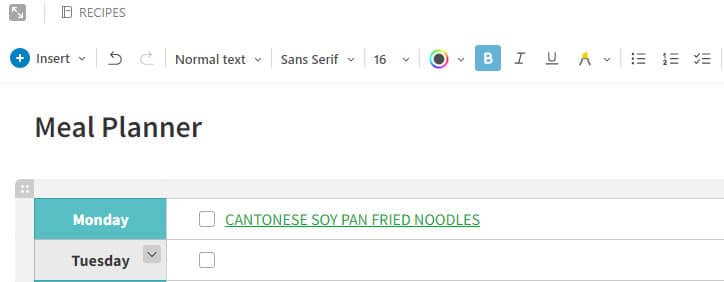
Rather than just typing the name of the recipe into your meal plan, create a link to that recipe so it’s a quick click away – no further searching.
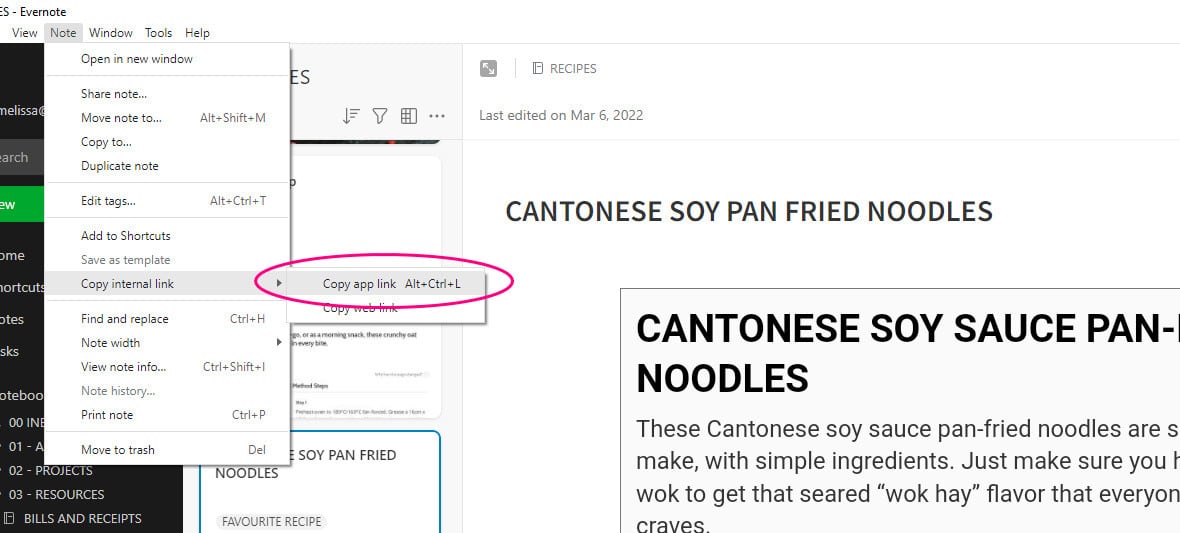
To create a link, with the recipe note open, go to Note>Copy Note Link>Copy App Link (or weblink if you would prefer to open the web page instead).
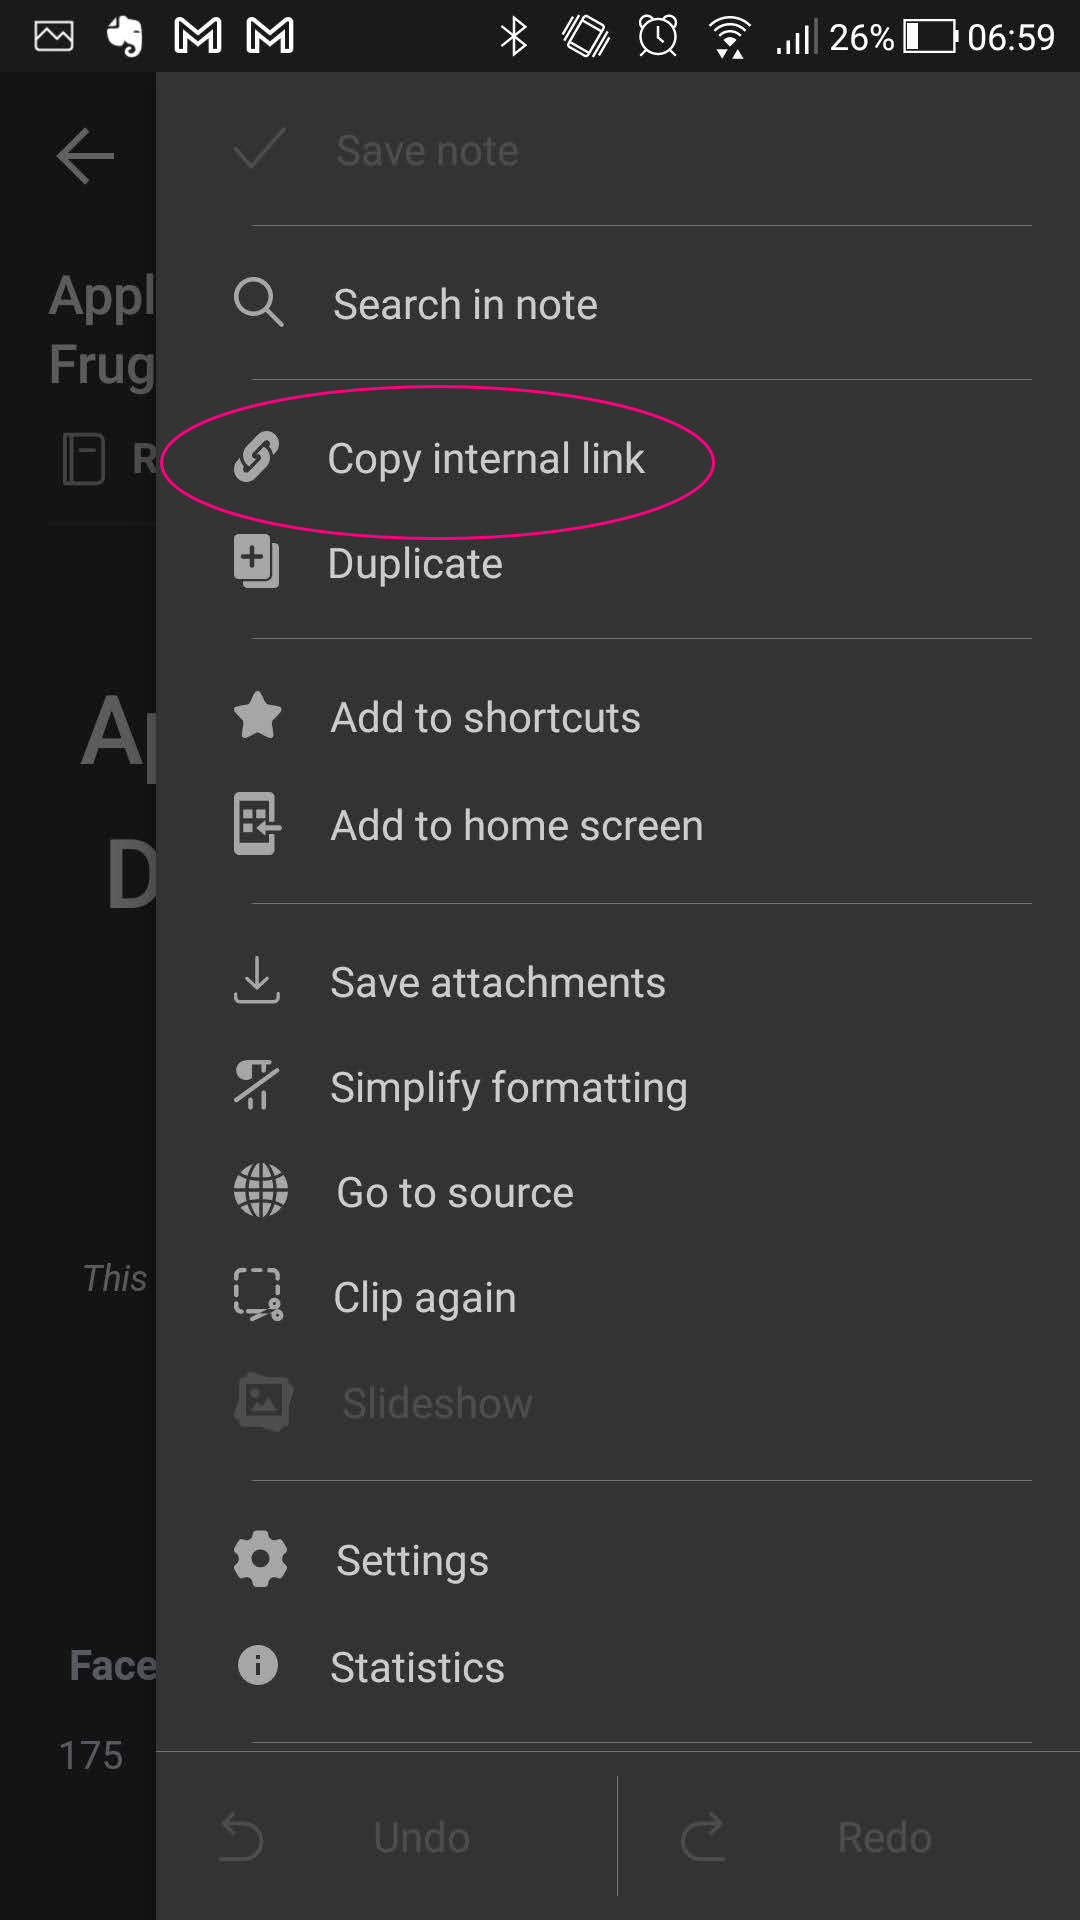
On mobile, click the three dots on the top right corner of the recipe and select ‘Copy internal link’.
Then go to your meal planning note and paste the link into the meal plan. Now when you tap on the link, it will take you directly to your recipe of the day.
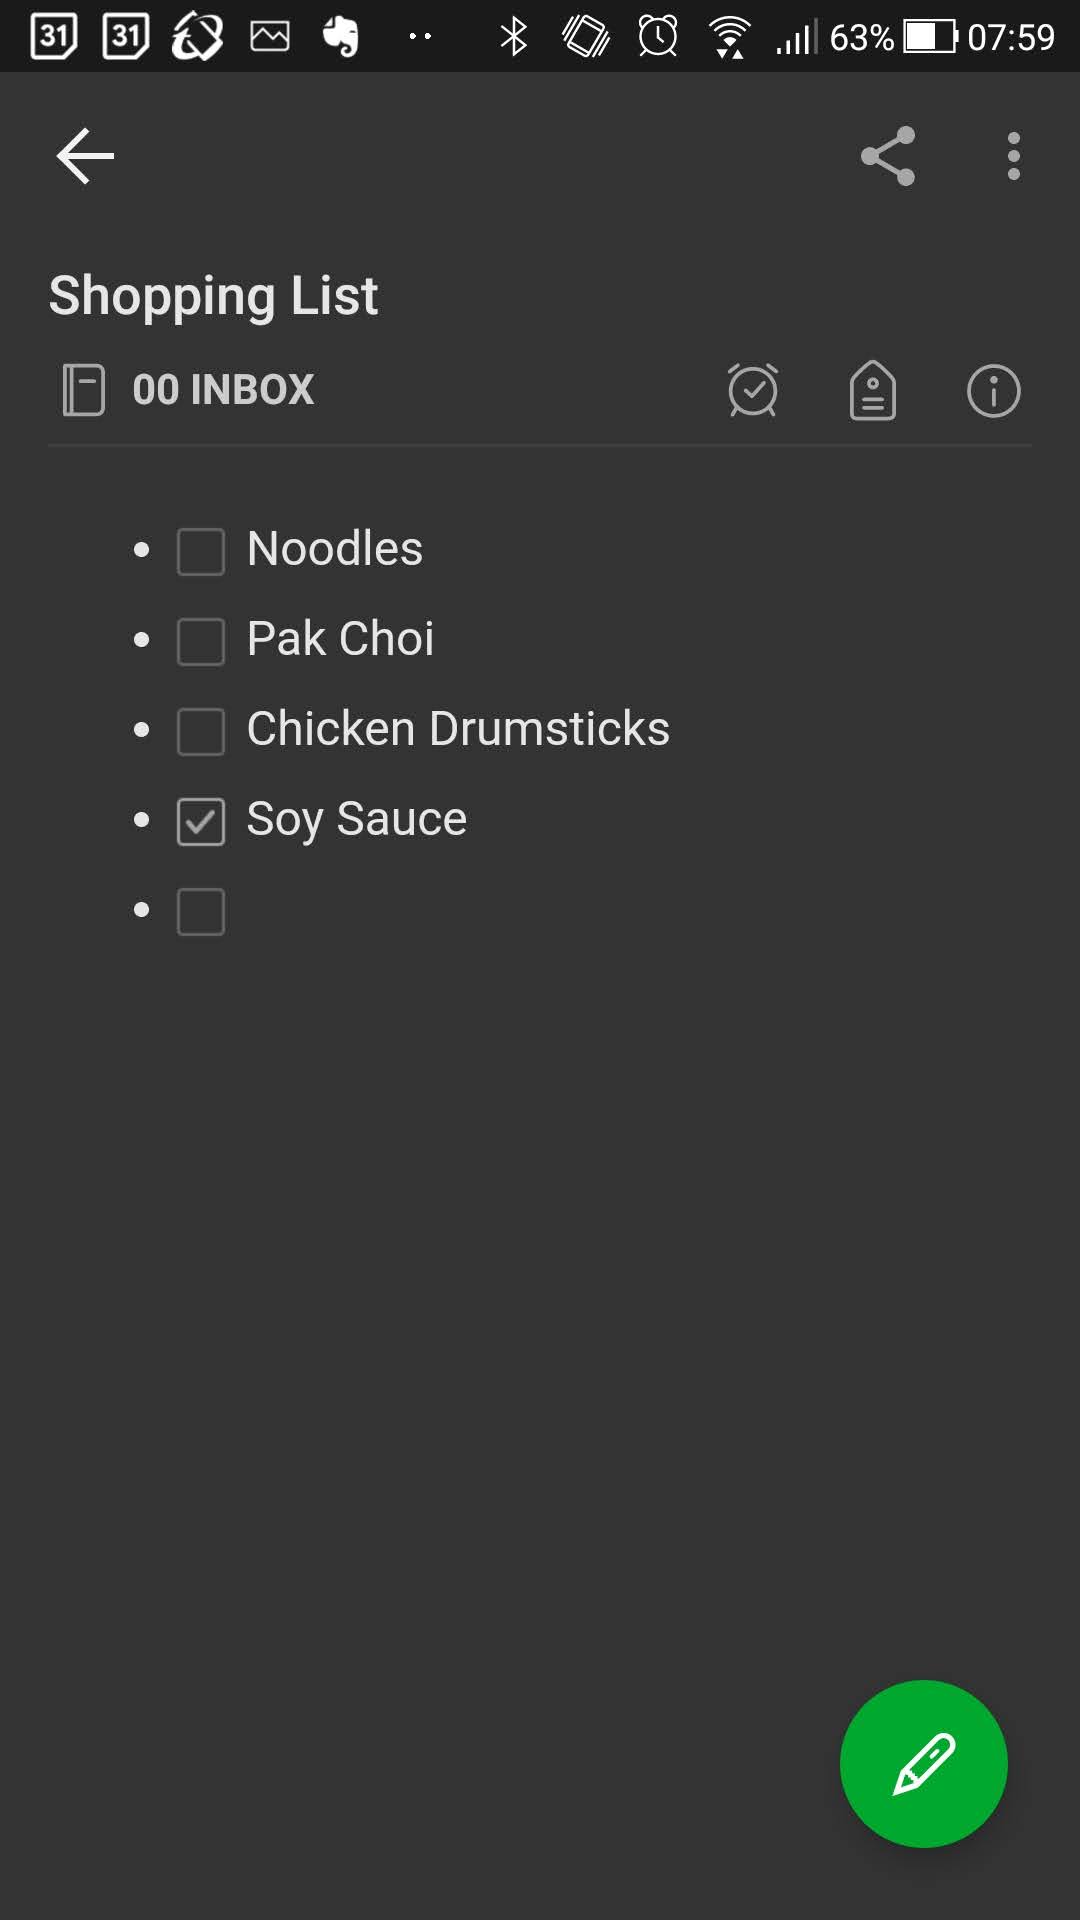
Creating a Shopping List in Evernote
As you’re reading through your recipes and putting them in your meal plan, don’t forget to write down any ingredients you need so you can buy them at your next shop.
To do this in Evernote, create a new note called shopping list. Add it to your shortcuts and mobile home screen as described above for easy access when you’re out shopping.
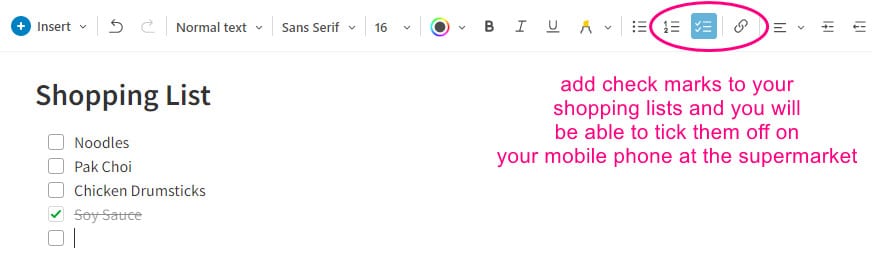
Adding check marks to your list means you can check the items off on your phone as you buy them.
There are a lot of software options out there to help you digitise, save, and manage recipes, meal plan, and create shopping lists but none that I’ve come across so far do it all like Evernote does, and I’m trying new apps and software all the time.
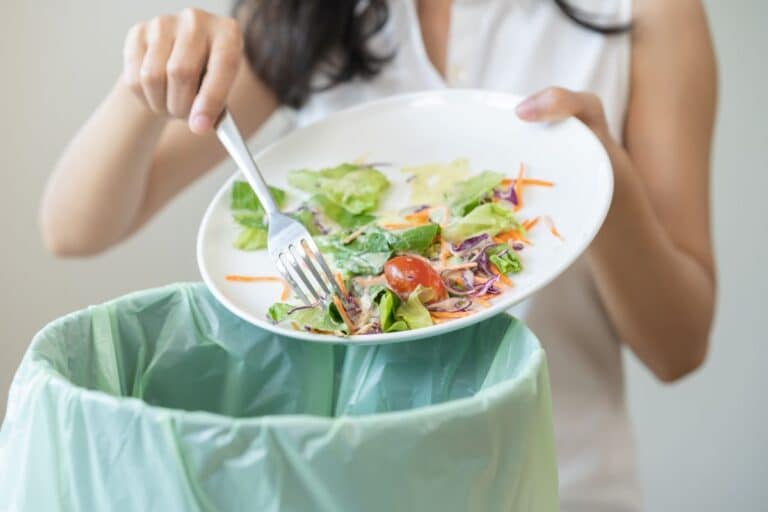
But because Evernote makes it very easy to save recipes, you run the risk of saving everything- you know, FOMO. And it can become too much. So it pays to be discerning when saving recipes and to delete the ones you try and don’t like.
My brother recommended I might like this blog. He was entirely right.
This post actually made my day. You cann’t imagine just how much time I had spent for this information! Thanks!
Thank you for this post. When I first went back to work after years at home caring for small children I wanted something to help me adjust to my new routines and installed Evernote so I could create cleaning schedules and meal plans. While it certainly helped me get good habits in place I didn’t know enough about the software to use it effectively and found that I gradually stopped using it as it seemed like just another thing to manage. After reading your post I realise I barely scratched the surface on how to use Evernote and plan to revisit it and look at using some of your tips to streamline my routines. This was very helpful. Thanks.
Glad it helped :)
What an excellent article. Well structured, great explanations, just really well done. I am inspired to make more of Evernote for meal planning now. Thank you.
Glad the article helped. Hope it goes well.