Stay on Top of the School Year Chaos with Google Calendar for Family Organisation
This website may earn commissions from purchases made through links in this post. As an Amazon Associate, I earn from qualifying purchases.

Keep on top of your family’s schedule. Here’s how to use Google Calendar for family organisation, taking the chaos out of managing activities, appointments, and more!
Sometimes, the planning, scheduling, organisation, and admin involved in raising kids feels like a full-time job.
Do you feel that too?
Between taxiing them to commitments, juggling communications, paying bills, and all the incidentals involved, it’s full on!
‘What do you mean you’re supposed to take a plate? Why are you telling me 20 minutes before the event?!’
‘The school musical auditions are today? You need a lift? Can you sing..?’
‘Camp is tomorrow…do your swimmers still fit?’
When the kids were younger, we protected their downtime—and ours—by limiting activities. But now, as young teens, they sign up for a multitude of extracurriculars. While we’re proud of their enthusiasm, the admin has multiplied!
And yes, we’re teaching them to manage their own schedules, but as the taxi service, bill-payers, and signatories, we (mostly me) remain the primary PAs.
The lifesaver?
A digital calendar.
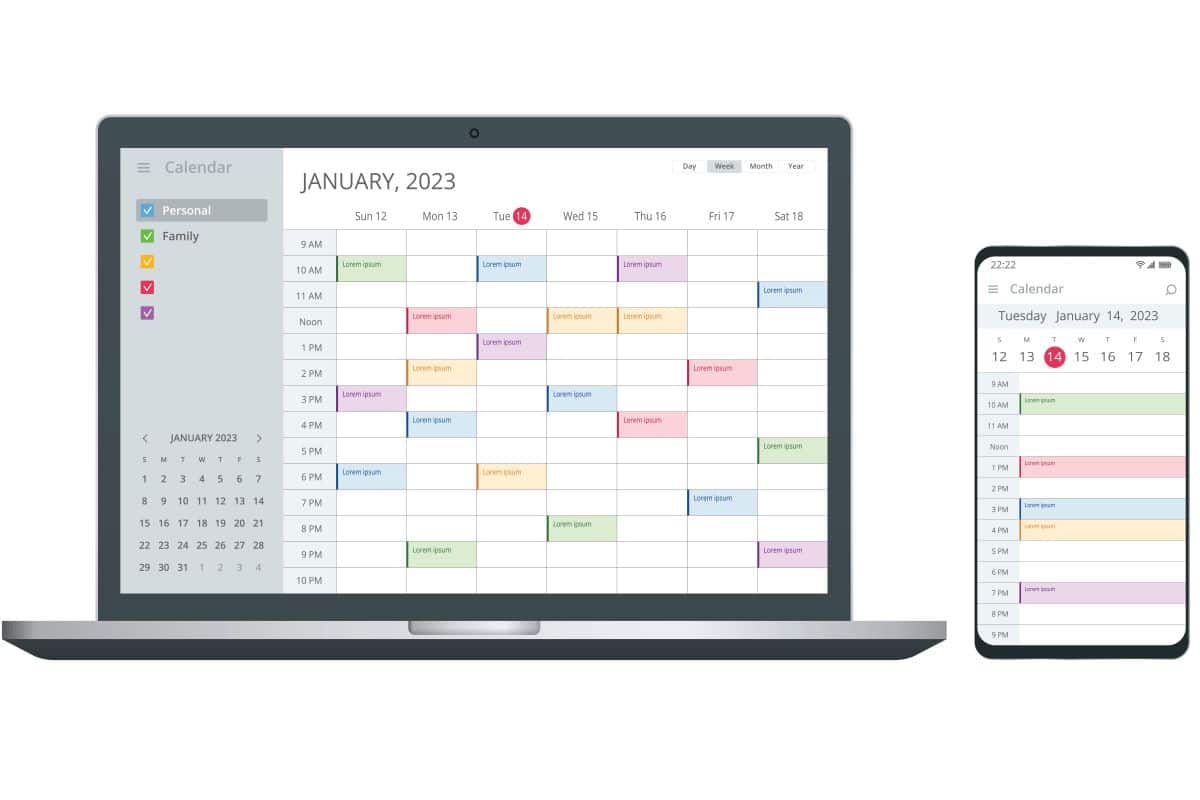
Whether it’s Google Calendar or something similar, an online calendar that syncs across devices and can be shared with the family is a game-changer.
Why use a digital calendar for family organisation?
Having a central repository of all your appointments, commitments, and tasks can reduce stress by helping you stay on top of your family’s schedule. With everything in one place, accessible anywhere, and shareable, you’ll spend less time juggling and more time focusing on what matters.
In this article, I’ll walk you through how we use Google Calendar to manage the chaos of the school year—and maybe even carve out some time for yourself.
You might also like:

Why Use Google Calendar For Family Organisation?
I used paper calendars for years before switching to Google Calendar 100%. And honestly, it’s always a good idea to have a backup.
But here’s why having a digital calendar is better than a pen-and-paper version:
- It syncs across devices. Whether at home, out and about, or waiting in the car, your schedule is always with you.
- It’s quick to update. It’s quick to add an event to your calendar on the spot so you don’t miss any important appointments. Spot a flyer for soccer try-outs at school? Put it in the calendar with reminders so you don’t miss out. And if plans change, a few taps and you can adjust the details.
- Sharing is simple. Everyone in the family can see what’s on the schedule, cutting down on the “Why didn’t you tell me?!” moments.
- Recurring events save time. Add an event once, and it will pop up every occurrence (daily, weekly, monthly, yearly, or custom) like clockwork. No need to add Aunt Fay’s birthday to the calendar every year! You can even schedule reminders a month ahead to have time to buy and send a gift.
- It’s free! No need to spend money on paper calendars and fancy planners.
Tip: double-check details just prior to the event to make sure there have been no last-minute changes. I’ve been caught out a few times where I’ve been super organised, recorded all the details meticulously, and added reminders and notifications, only to miss a last-minute change like an updated pick-up time. Turns out you can be too organised!
Step-by-Step Guide to Setting Up Your Calendar
Setting up a family calendar is the first step to simplifying your busy schedule and keeping everyone on the same page.
Step 1. Sign Up for a Google Account
To set up your family calendar on Google Calendar (GCal), you’ll need a Gmail/Google account.
(While other digital calendars, like Microsoft Outlook, follow a similar setup, I’ll focus on GCal in this article because it’s what I use and find the most user-friendly.)
If you want to sync calendars with family members, they’ll need a Google account, too.
Don’t want multiple accounts for kids? You can create a shared family Google account that everyone uses to access the calendar. The downside to this option is that everyone can see, change, and delete events, which can be tricky if the kids start playing around with the calendar.
You’ll also want to add the GCal app to your phone (and family members, too). While you can use the phone’s native calendar app, I find the GCal app syncs more reliably.
Decision Time: One Calendar or More?
You have two options:
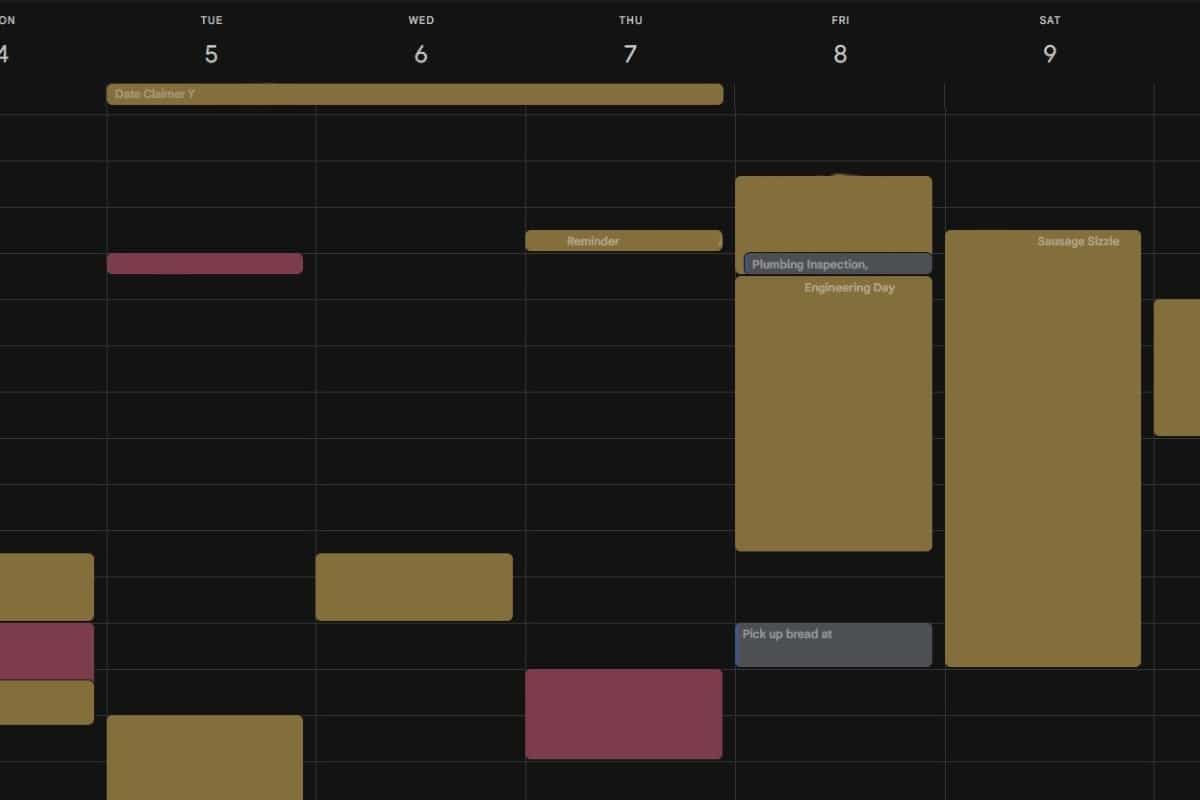
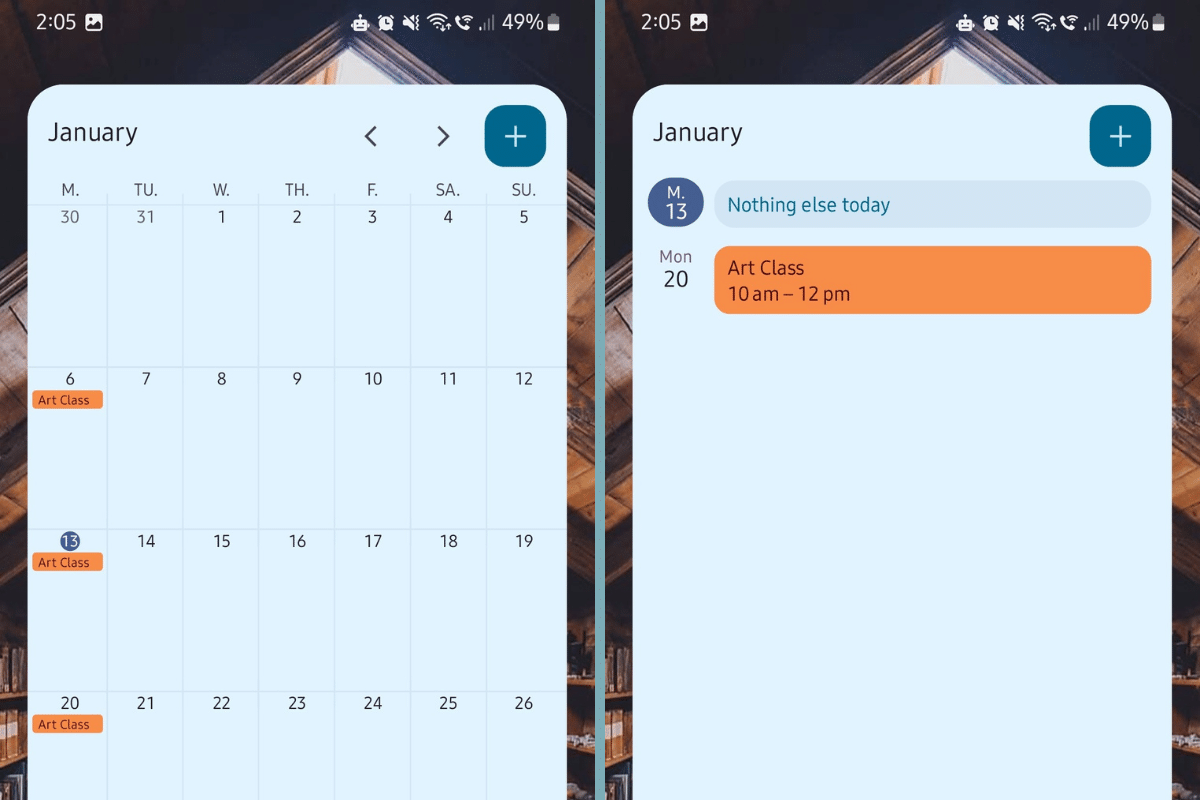
- Single Calendar: Set up one household calendar and colour-code events. For example, you might have the “Bruce Family Calendar” where:
- Yellow events = family events.
- Blue events = one child’s activities.
- Orange events = another child’s activities.
- Multiple Calendars: Create a separate calendar for each family member.
You can always change your mind later! We started with a single calendar, but as the kids got older and wanted to manage their own schedules (and avoid their siblings’ notifications), we switched to separate calendars for each child. Both hubby and I have access to the kids’ calendars so we’re all on the same page.
Default Settings
Once you have a Google account, you’ll notice a few default calendars on the left-hand side (desktop) or behind the menu (top left on mobile): your main calendar, birthdays, tasks, and holidays. I put everything in the main calendar and ignore the birthdays, tasks, and holidays, so we’re all on the same page.
To rename your main calendar, hover over its name (desktop only), click the three dots, and select Settings and Sharing. From there, you can change the name to something more personal, like ‘Family Calendar.’
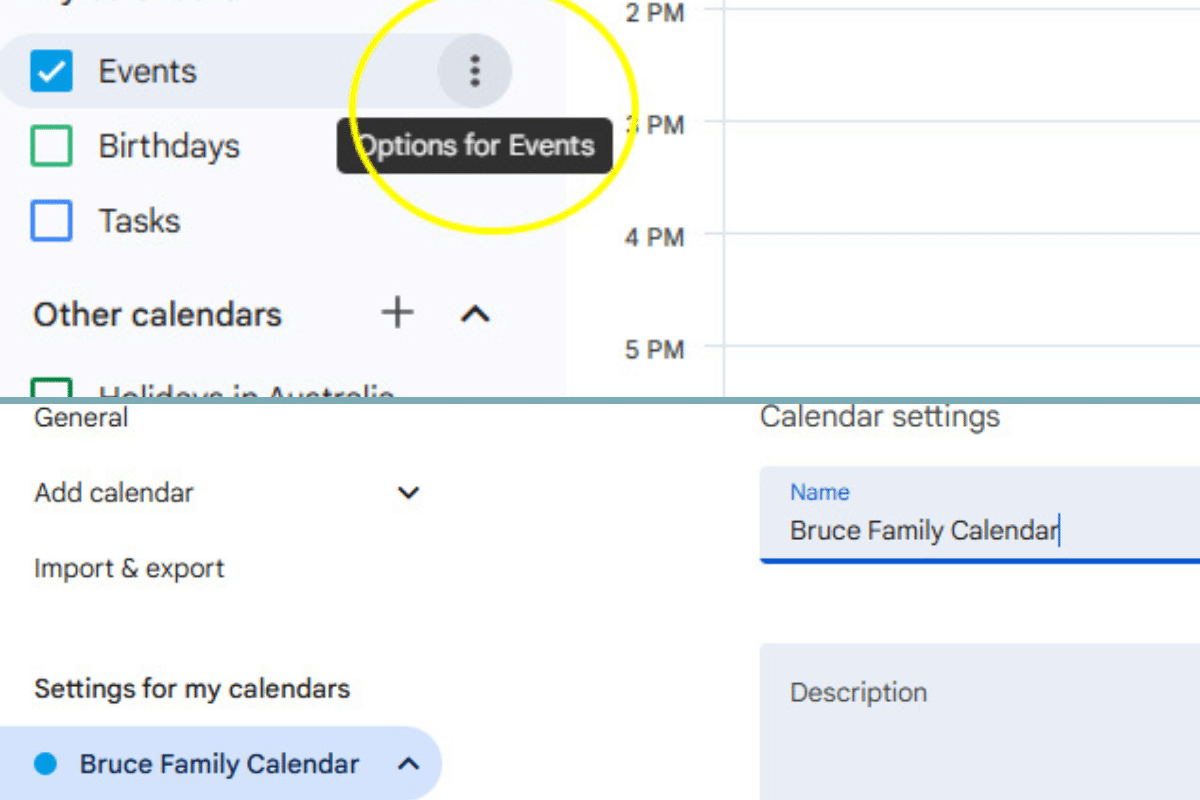
Note: On the mobile app, this calendar will automatically be labelled ‘Events’ (see how to change the name on mobile below).
Finally, head to the Settings menu (the cog on the top-right corner of the desktop or at the bottom of the sidebar on mobile, then General) to customise preferences like:
- The day your week starts (Sunday or Monday).
- Your time zone.
- The date format.
- Other personal settings.

These preferences can be adjusted anytime to suit your needs.
Step 2: Add Calendars (Optional)
If, like us, you want to have separate calendars for each child, you can add those calendars now. Here’s how:
On Desktop:
- Open Google Calendar on your browser.
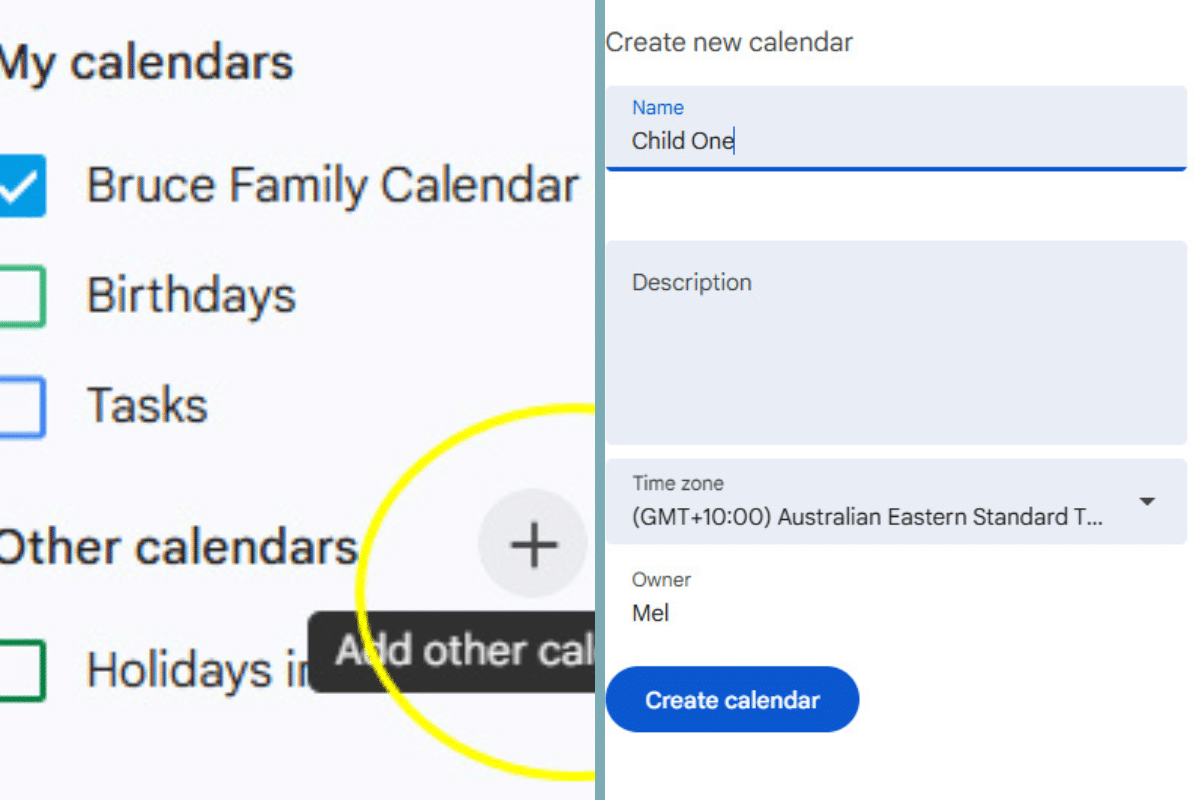
- On the left-hand sidebar, find My Calendars.
- Click the plus (+) icon next to Other Calendars.
- Select Create New Calendar.
- Enter a name for the calendar (e.g., ‘Emily’s Calendar’).
- Add an optional description or adjust the time zone if needed.
- Click Create Calendar.
- Repeat these steps for each additional calendar you want to create.
On Mobile:
Creating a new calendar on mobile is a little tricky—this, along with Step 4 (sharing calendars) and renaming calendars, are the only three steps that are not as straightforward on mobile. If you have access to a computer, it’s much easier to do this step there. If not, here’s how to do it directly on your phone:
- In the browser (like Chrome), open this link in a new tab by long-pressing the link and selecting Open in new tab: https://calendar.google.com/calendar/r/. If it still redirects to the app, copy and paste the link into a new tab manually.
- Follow the same instructions as above. You may need to pinch-zoom the screen to see the text.
Step 3: Colour Code Your Calendars
Once your calendars are created, assign each one a unique colour to make it easy to differentiate at a glance. (Your kids might even want a say in picking their colours!)
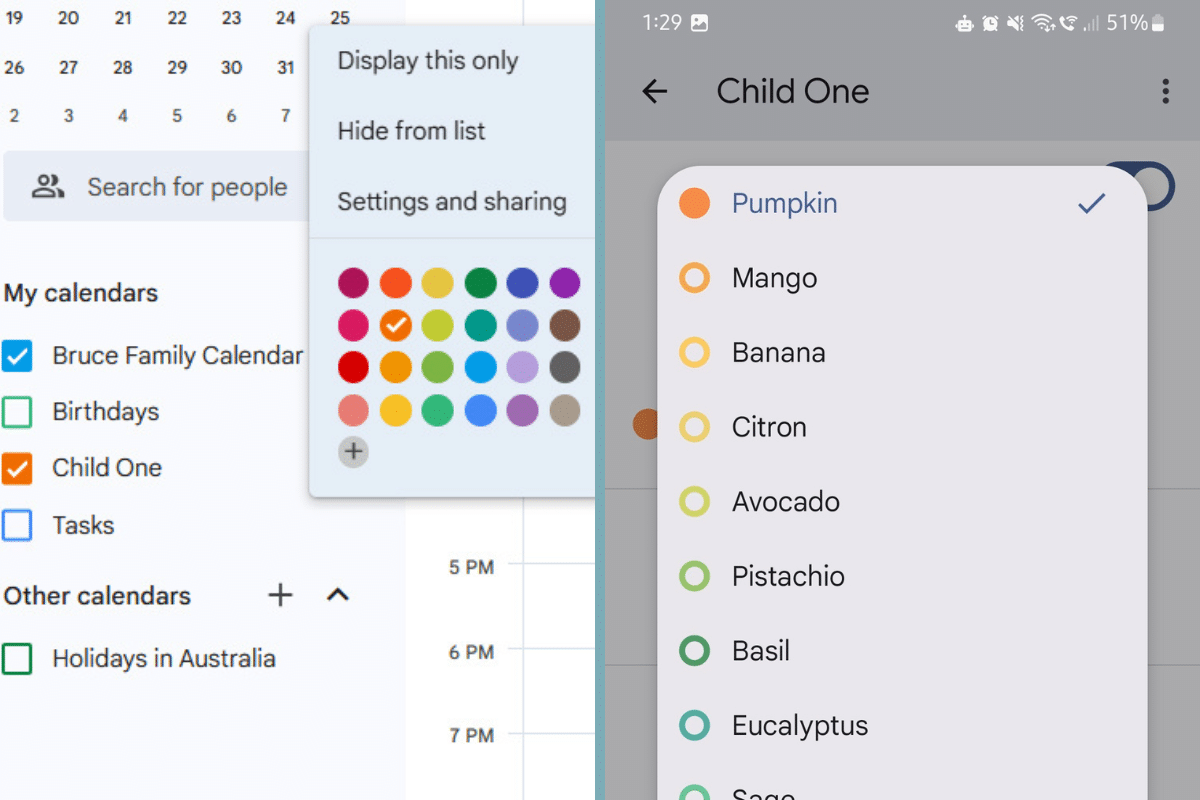
- On Desktop: Hover over the calendar name, click the three dots, and select a colour from the options.
- On Mobile: Long-press the calendar and release. Tap Colour to select the calendar colour. Or, tap Settings in the menu, Click on the calendar you want to change the colour of, and then click Colour to change.
For Single Calendars:
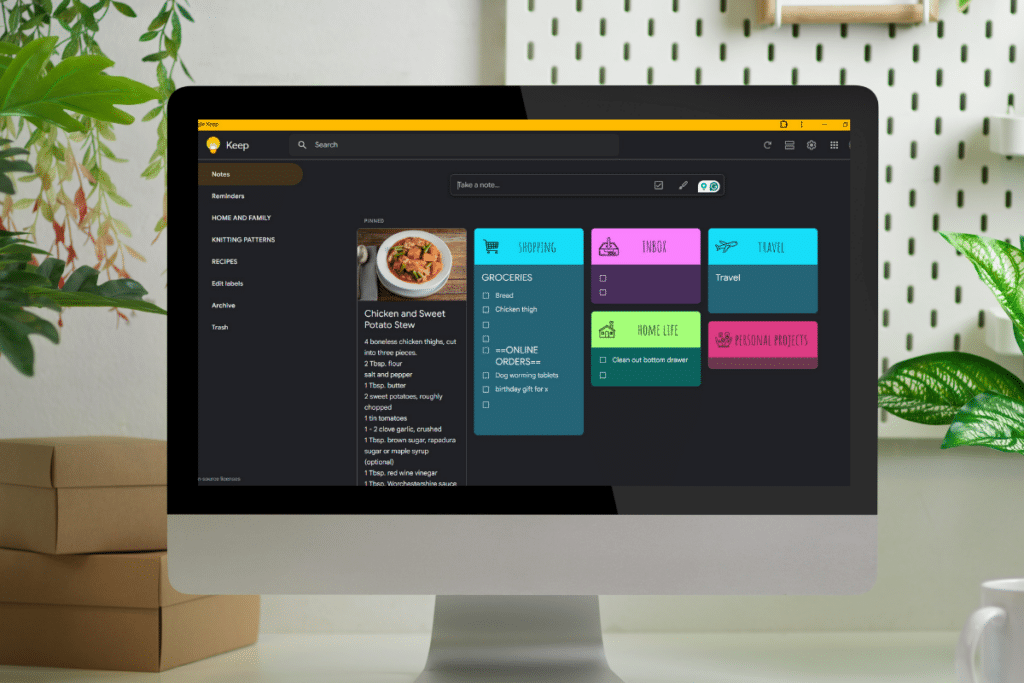
If you’re using just one calendar for the whole family, assign specific colours to each child or event type instead. Keep a note of your colour key somewhere easy to access—Google Keep works well for this!
Step 4: Share Your Calendars
Sharing calendars allows everyone in the family to stay in the loop and access the schedule. Here’s how to share your calendars with others:
On Desktop:
- Open Google Calendar and locate the calendar you want to share in the My Calendars section.
- Hover over the calendar name, click the three dots, and select Settings and Sharing.
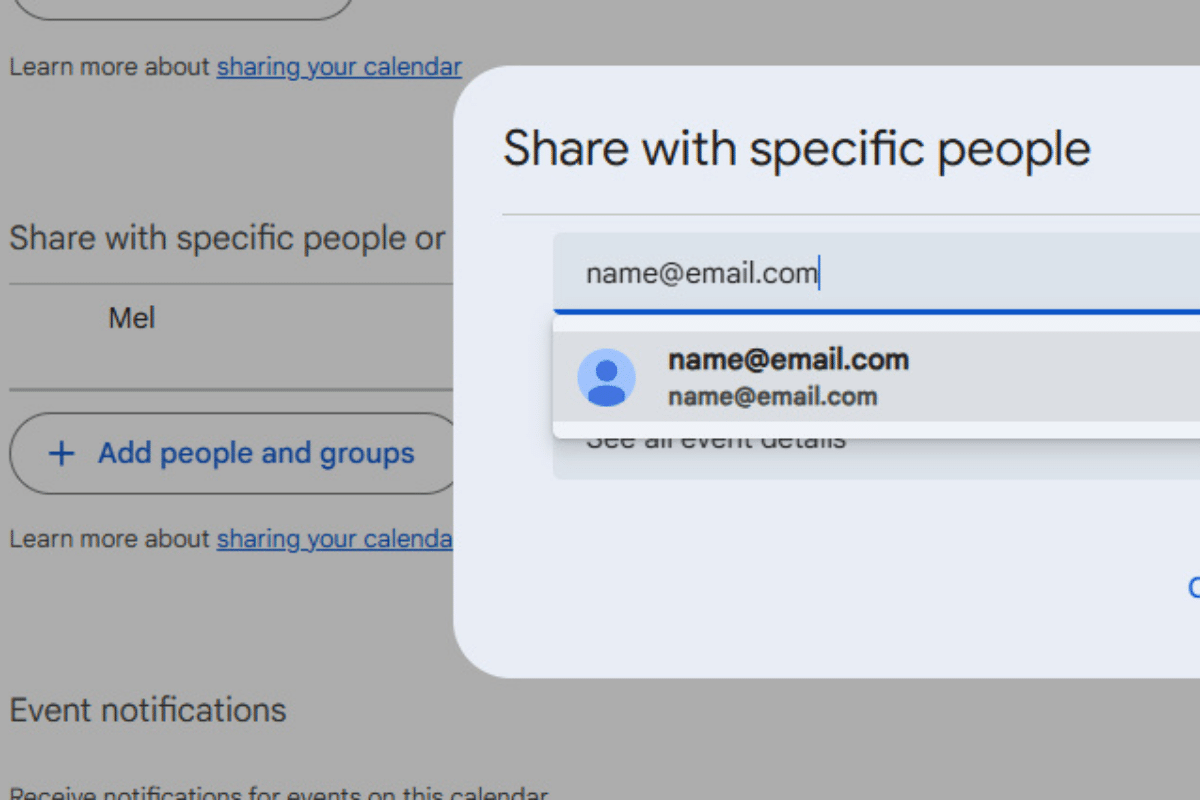
- Scroll to the Share with specific people section.
- Click Add people, then enter the email address of the family member(s) you want to share with.
- Choose their level of access:
- See only free/busy (hides details).
- See all event details.
- Make changes to events.
- Click Send to share the calendar.
On Mobile:
Open Google Calendar in your browser (follow the instructions in Step 1). Then, follow the same steps as for the desktop.
Accessing Shared Calendars:
- Each family member will receive an email invitation to their Gmail account. They need to click the link or button (e.g., Add this calendar) to accept the invitation.
- Once accepted, the shared calendar will automatically appear in their Google Calendar under Other Calendars (desktop) or in the menu (mobile app). They will need to allow notifications for the calendar.
- If you’re using a single family calendar under one Gmail account, family members can simply log into that account on their device to access it.
Step 5. Adding Events
Once your calendars are set up, it’s time to start adding events.
I add EVERYTHING to my calendars: recurring school events like band practice and sports, school holiday dates, birthdays, dentist appointments, extracurricular activities…the lot.
If I’m not sure of the exact details, I put a placeholder with a time of All day and write in the event heading ‘Details TBA’. I might also add a notification a week or so prior to remind me to check the details.
Here’s how to add events if you’re new to calendaring:
On Desktop:
- Open Google Calendar and click on the day and time to get started (you can adjust this in the next window if necessary).
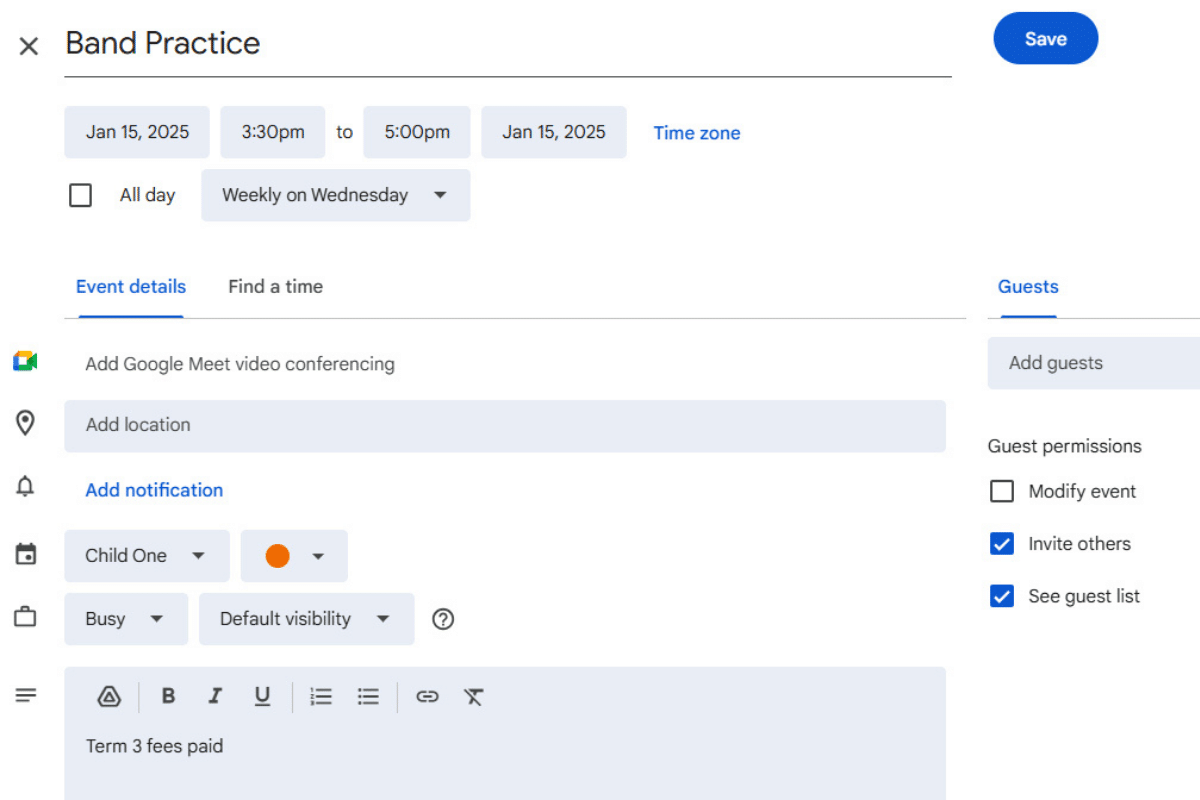
- In the event pop-up window (you can expand the options by clicking More Options if needed):
- Add a title: Name your event (e.g., ‘Soccer Practice’ or ‘Parent-Teacher Meeting’). You can also add who is attending (after discussion) so everyone is on the same page i.e. Mum attending or Dad attending.
- Select the calendar: Use the drop-down menu to choose the correct calendar (e.g., your child’s or the family calendar).
- Set the time: Add a start and end time. If it’s an all-day event, check the All Day box.
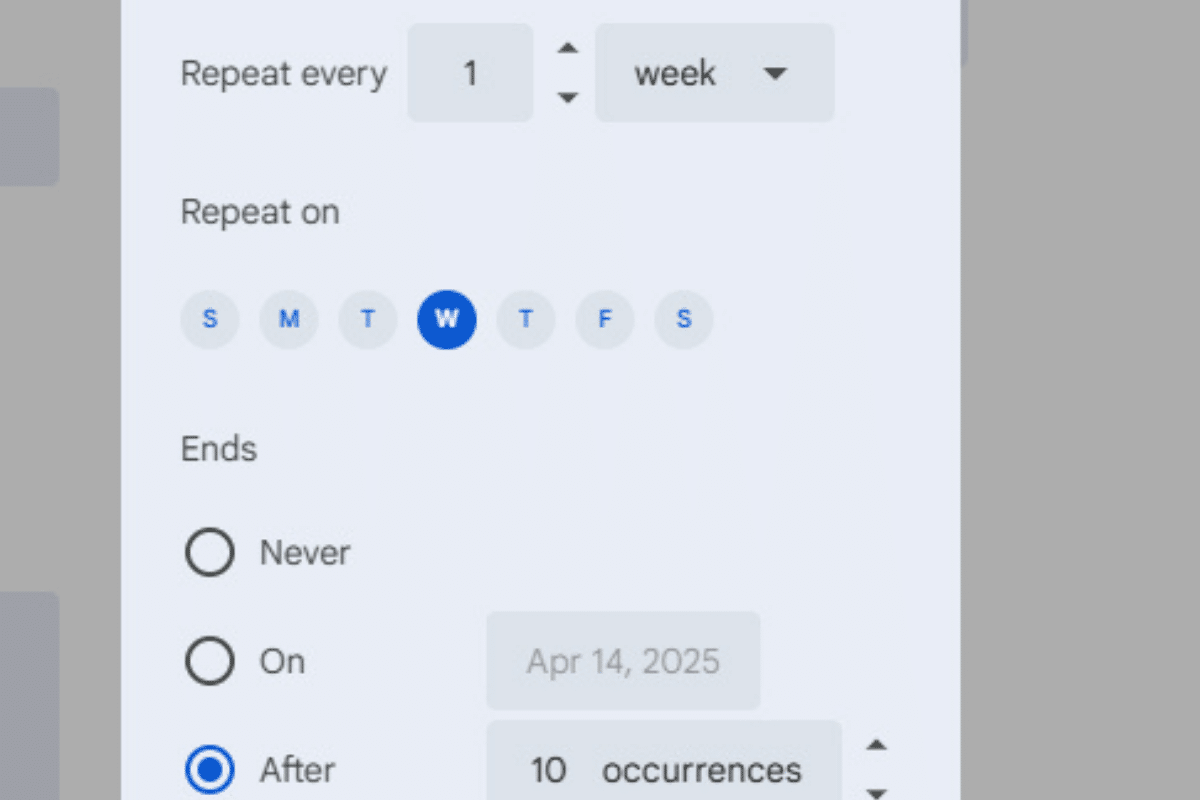
- Add recurrence: If the event repeats (e.g., weekly piano lessons), click ‘Does not repeat’ and choose the appropriate option (daily, weekly, monthly, custom).
- Add notifications: Set reminders to ensure you don’t forget. You can choose pop-up notifications, emails, or both.
- Add details or location (optional): Use the description box to include extra details or a location for navigation. Here, I add details like carpooling details, notes that I’ve paid the fees (because I forget stuff these days), notes about what we need to bring, etc.
- Add an attachment (optional): Attach important information as a document. For example, for Scout camp, I attach the PDF packing list to the event and then when the kids are packing, they can click the event and view the packing list. To add, click the Google Drive icon and either add from your Google Drive or upload from your computer.
- Click Save to add the event to your calendar.
On Mobile:
- Tap on the screen on the day and time, or tap the + sign in the bottom right-hand corner.
- Follow the same instructions as above to add the title, calendar, time, recurrence, notifications, and additional details.
Pre-Event Tasks. Some events need pre-planning or tasks done prior to. For tasks like buying a birthday present or baking for the bake sale, set reminders to help you prepare. You have three options:
- Add a separate event a week beforehand (or whatever day you want to do it).
- Add a notification for a week (or other) beforehand to the original event and a reminder in the description.
- Schedule a separate task instead of an event by following the same steps as above but selecting ‘Task’ in the pop-up window.
You might also like:
Using Your Family Google Calendar To Stay Organised All Year Round
While a digital calendar makes life So. Much. Easier. it’s not a set-and-forget deal.
Yep, unfortunately, there’s a tiny bit of work involved to keep the cogs all turning smoothly.
But I promise, the few minutes a week you spend to keep on top of your calendar, will save you HOURS of stress and chaos in the long run.
(As long as the kids don’t leave permission notes forgotten at the bottom of their school bag, that is!)
Here’s how I keep my calendar working for us.
Daily
I check my calendar briefly every morning just to make sure I’m on top of the day.
As events come in, whether it’s from emails, paper notes, flyers, texts, messenger, Facebook, conversations, etc., I add them straight into the calendar or as soon after as practical.
If they are going to be recurring events, then I add the recurrence, so that’s an event that I can set or forget.
You can even specify the number of recurrences. For example, my son did wakeboarding for school sports in Term 3. So I put nine recurrences of the event with notifications reminding him to pack his swimmers for each sports day. He gets those reminders.
It feels like a lot of work (kids admin IS a lot of work), but most days, you won’t be adding events to your calendar, just checking it briefly.
Pro tip: you can use the calendar widget on your mobile phone to add a daily or monthly calendar view to one of your home screens so you can see at a glance what’s on for the day, without even opening the app!
Weekly
On Sundays, I do a weekly review by checking the calendar, making sure there’s nothing I have to do before an event (like buying or cooking food to ‘bring a plate’), and I double-check communications channels to make sure there’s nothing I’ve missed, or any details have changed. This takes about five minutes to do.
Many organisations use multiple communication channels, and I’ve found it’s easy to miss vital info because I’ve checked one channel and not another. For example, the school sends emails, updates Facebook, uses a dedicated app and sometimes texts! Scouts use a shared dynamic Word document that we’re supposed to check every week, plus a Facebook group for updates. Bringing all that information into one place makes it easy to keep track of what’s going on.
It’s also a good idea at this point to ask the family if there’s anything that needs adding.
For example, any forgotten permission slips in the bottom of school bags? Any arranged lunches with the in-laws that slipped anyone’s mind (true story)? Or a car service booked in but not added to the calendar (so all car appointments won’t be happening that day), etc.

Yearly/Periodically/ Per School Term
The great thing about recurring events is you never have to transfer Aunt Fay’s birthday from one calendar to another every year like the old days.
However, a digital calendar does need a clear out every now and then.
At the start of the year, I spend about 20 minutes adding key dates that don’t recur at the same time, like school holidays or local public holidays.
At the beginning of the school term, we get a term planner for many of the kids’ extracurricular activities, so I add date claimers, even if I don’t have all the details, for things like camps, band performances, and other future events.
Adding these dates early makes planning easier throughout the year.
You might also like:
A family calendar isn’t just a tool—it’s a lifesaver for busy households juggling school, extracurricular activities, and everything in between.
By setting up and maintaining a shared Google Calendar, you’re creating a system that not only reduces stress but also helps everyone stay on the same page (literally). With just a few minutes of effort each week, you’ll reduce last-minute panics (I can’t promise they will all go away) and be ready for whatever the school year throws your way.
Now it’s your turn! Take a few minutes today to set up your family calendar and start adding those key dates.
If you found this guide helpful, let me know in the comments! And if you’ve got your own tips for using a digital calendar, I’d love to hear them. Happy organising!